Paint the Paper Plate: Start by painting the paper plate with dark green paint. This will form the body of your dinosaur. Allow the paint to dry completely before proceeding to the next step.Prepare the body: Once the light green base is dry, cut the plate in half. Use one half for the body and on the other half trace the outline of a dinosaur neck and head and tail on the back of the plate. Use scissors to cut them out. Also cut out small triangles for the spines of the back of the dinosaur from what's left of the half of paper plate.
Prepare the Legs: Cut the cardboard tube into 2 equal parts. Make two slits one inch in the top of each half of the tube. You will slide the finised dinosaur craft down the slits to stand it up once you are done. Paint each tube with the same green paint used for the body. Allow them to dry.
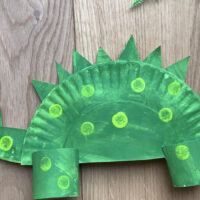
Add detail on the Dinosaur body: Use a circle foam brush to dab light green spots over the body to give your dinosaur texture and depth. This mimics the dinosaur’s skin and adds visual interest to your craft.
Put the body together: Once all painted parts are dry, glue on the head, tail and spikes.
Assemble the Dinosaur: Slide the legs to the underside of the paper plate. Make sure they are evenly spaced and strong enough to hold the plate upright if desired.
Add Facial Features: Attach the google eyes to the face area of the plate. Use a black marker to draw a smiling mouth, nostrils, or any other facial features you like. This brings your dinosaur to life with personality and charm.
Finishing Touches: tail or spikes, painting them to match the body and gluing them in place.