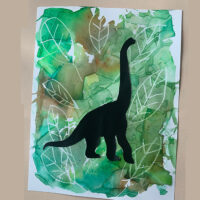
Bleeding Tissue Paper Dinosaur Craft
Servings: 0
Ingredients
- Watercolor paper
- White crayon
- Bleeding tissue paper (in various shades of green, brown, and orange)
- Spray bottle with water
- Dinosaur printable (available below)
Instructions
- Draw the Background: Start by drawing leaves, trees, or other prehistoric plants on the white watercolor paper using a white crayon. The crayon creates a wax resist that will appear once the project is complete.
- Prepare the Tissue Paper: Cut the bleeding tissue paper into squares of various sizes. You can mix and match colors to mimic the lush, diverse vegetation of the Mesozoic era.
- Begin the Magic: Lightly spray the drawn watercolor paper with water from your spray bottle. The paper should be damp but not soaking wet.
- Apply the Tissue Paper: Place the squares of bleeding tissue paper onto the damp paper. Overlap them and cover the entire page, creating a dense jungle-like feel.
- Spray Again: Once all the tissue squares are in place, give the paper another light spray with water. This will help the colors from the tissue paper start bleeding into the watercolor paper, creating your colorful background.
- Let It Dry: Allow the paper to dry completely. This might take a while, so be patient! The drying process is when the real magic happens.
- Reveal the Artwork: Gently peel off the dried tissue paper to reveal the colorful background. You’ll see how the white crayon drawings stand out against the vivid colors.
- Add the Dinosaurs: Cut out a dinosaur from the printable provided below and glue it onto your vibrant prehistoric scene.