Bubble Wrap Chick Craft
Servings: 0
Ingredients
- Bubble wrap
- Paint (assorted colors)
- Paintbrush
- White cardstock
- Scissors
- Glue
- Egg carton
Instructions
- Cut Out Chick Shapes: Start by cutting out two chicken profiles from white cardstock. Each profile should resemble a semi-circle with a half-oval on top. Additionally, cut out the beak, two wings, a tail, and the top plumage. Also cut out two white circles and two black ones for eyes.
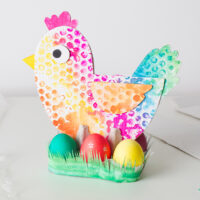
- Bubble Wrap Painting: Lay out a sheet of bubble wrap and apply paint in various colors. Press the cutout shapes for the chick's body, wings, and tail onto the painted bubble wrap, ensuring each piece is coated with paint. Apply the paint to one side of each piece so that they can be glued back-to-back, creating a decorated chick visible from both sides. Paint the beak yellow and the top plumage red, then set all pieces aside to dry.
- Assemble the Chick: Once dry, glue the wings to either side of one chick profile, attach the tail and the beak to one side, and add the top plumage. Then, glue the second chick profile on top, creating a 3D effect. Finally add the eyes by gluing the black circles to the white ones and then on to the chick head.
- Create the Grass: Cut a rectangular strip from white cardstock long enough to wrap around the egg carton. Paint another sheet of bubble wrap green and press the rectangular strip onto it. Once dry, cut the top edge to resemble grass and glue it around the egg carton.
- Final Assembly: Make a slit in the middle of the egg carton and slide the assembled chick through it. Add decorated Easter eggs to the carton to complete your centerpiece.