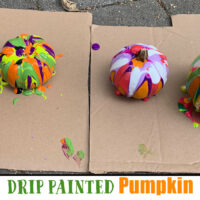
Drip Painted Pumpkin
Servings: 0
Ingredients
- Real or fake pumpkins
- Washable or acrylic paint in various colors
- Newspaper or cardboard to contain the mess
Instructions
- Whether real or fake, make sure your pumpkin is clean and dry before you begin. If it's real, wipe it down to remove any dirt or debris.
- Select a few paint colors that you want to use. Remember you can use washable paint or acrylic paint. You can go for a traditional Halloween theme with purple, black, and green, or let your child's imagination run wild with a rainbow of colors. (that's what we did!)
- You can squeeze the paint directly from the bottle or you can dilute the paint with a very small amount of water and use a plastic spoon to drizzle it over the pumpkin. Encourage your child to experiment with different patterns and designs. You cantrip small dots of paint on the top of the pumpkin or drizzle paint all around the top and watch it drip down. If you're using acrylic paint, you can drizzle it on the top of the pumpkin's surface.
- As the paint drips down the sides of the pumpkin, watch how it creates unique and beautiful patterns. This is where the real artistic magic happens!
- Drip paint all over, its fun to drip paint on top of each other so we the colours flow together.
- Allow the paint to dry completely. For washable paint, you can wash it off and start again for a new design. For acrylic paint, your pumpkin masterpiece is here to stay.
- Once the paint is dry, proudly display your Paint Drip Pumpkin as a festive and colorful addition to your fall decor.