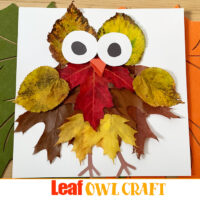
Leaf Owl Craft for Kids
Servings: 0
Ingredients
- Glue
- Fallen leaves
- White, black, orange and brown construction paper
- Scissors
Instructions
- Leaf Gathering: Start by venturing outdoors with your little one to collect fallen leaves. Look for leaves of various shapes and sizes to add character to your owl creations.
- Owl Body: Choose a few leaves to use as the owl body and wings. Your creativity will come into play here. You can use a nice big red leaf like we did are any leaf your little one likes.
- Feathered Wings: Choose a leaf leaves that are similar in choose and size and shape and use they for the wings fo the owl.
- Leafy Plumage: On the page draw the outline of the owl body and eyes. Now comes the fun part! Apply glue to the back of each leaf you collected and start attaching them to the owl's body. Overlap the leaves to create the appearance of feathery plumage. Be as creative as you like with your leaf arrangement!
- Beak, Eyes and Feet: Cut a small triangle from the orange construction paper for the owl's beak. Then, cut two large circles from the white paper for the eyes. Cut two smaller circles from the black paper to create the pupils. Finally, cut two feet from the brown paper.
- Expressive Eyes: Glue the white eye circles onto the owl's body, and then attach the black pupil circles onto the white circles. Position the eyes to give your owl its unique expression.
- Beak and feet Placement: Glue the orange beak beneath the owl's eyes, slightly overlapping them. Glue the feet to the bottom of the leaves.
- Finishing Touches: Allow your owl to dry completely. Once it's dry, you can add any extra details you like, such as talons or extra feathers.