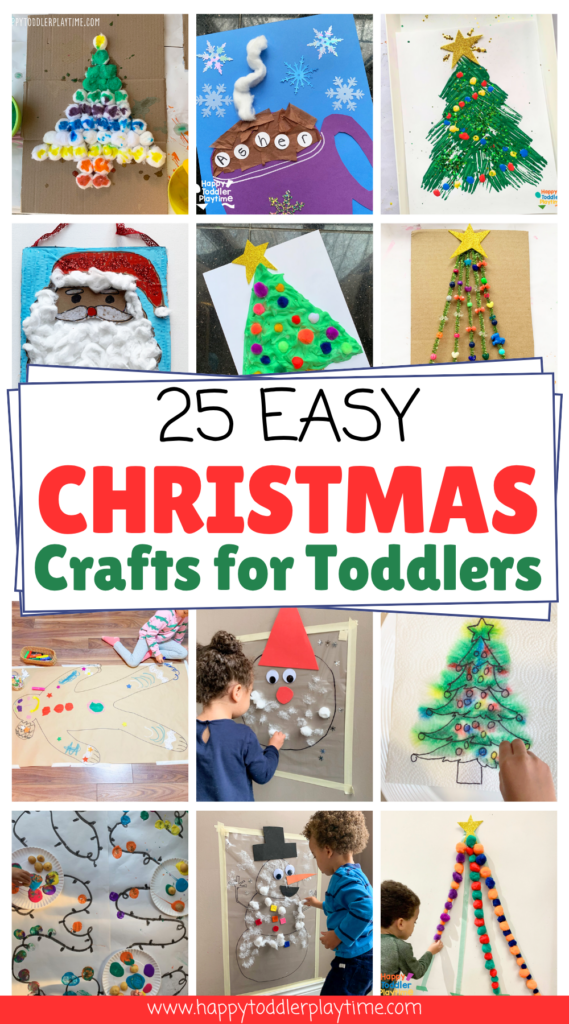
If you’re looking for simple, festive, and joy-filled Christmas crafts for toddlers, you’re in the right place. There’s something magical about watching little hands paint, glue, and sprinkle their way into the holiday spirit. Whether your child is all about glitter or prefers sticking pom poms and paper shapes, Christmas crafting is a perfect way to slow down, connect, and create together.
The best part? These crafts are easy to set up, use simple materials you probably already have at home, and are designed for little hands to explore at their own pace. Think paper plate reindeer, cotton ball Santas, and fingerprint ornaments—cute, approachable projects that double as keepsakes for years to come.
Crafting during the holidays isn’t just about the end result—it’s about giving kids space to play, experiment, and feel proud of what they make. These Christmas crafts invite toddlers to explore textures, colors, and shapes while strengthening fine motor skills and sparking creativity.
So grab your glue, a few red and green supplies, and get ready for a cozy afternoon of festive fun. These toddler-friendly Christmas crafts will make your home feel extra merry and bright this season!
Looking for more Fun Christmas Crafts & Activities? Check out these fun ideas:
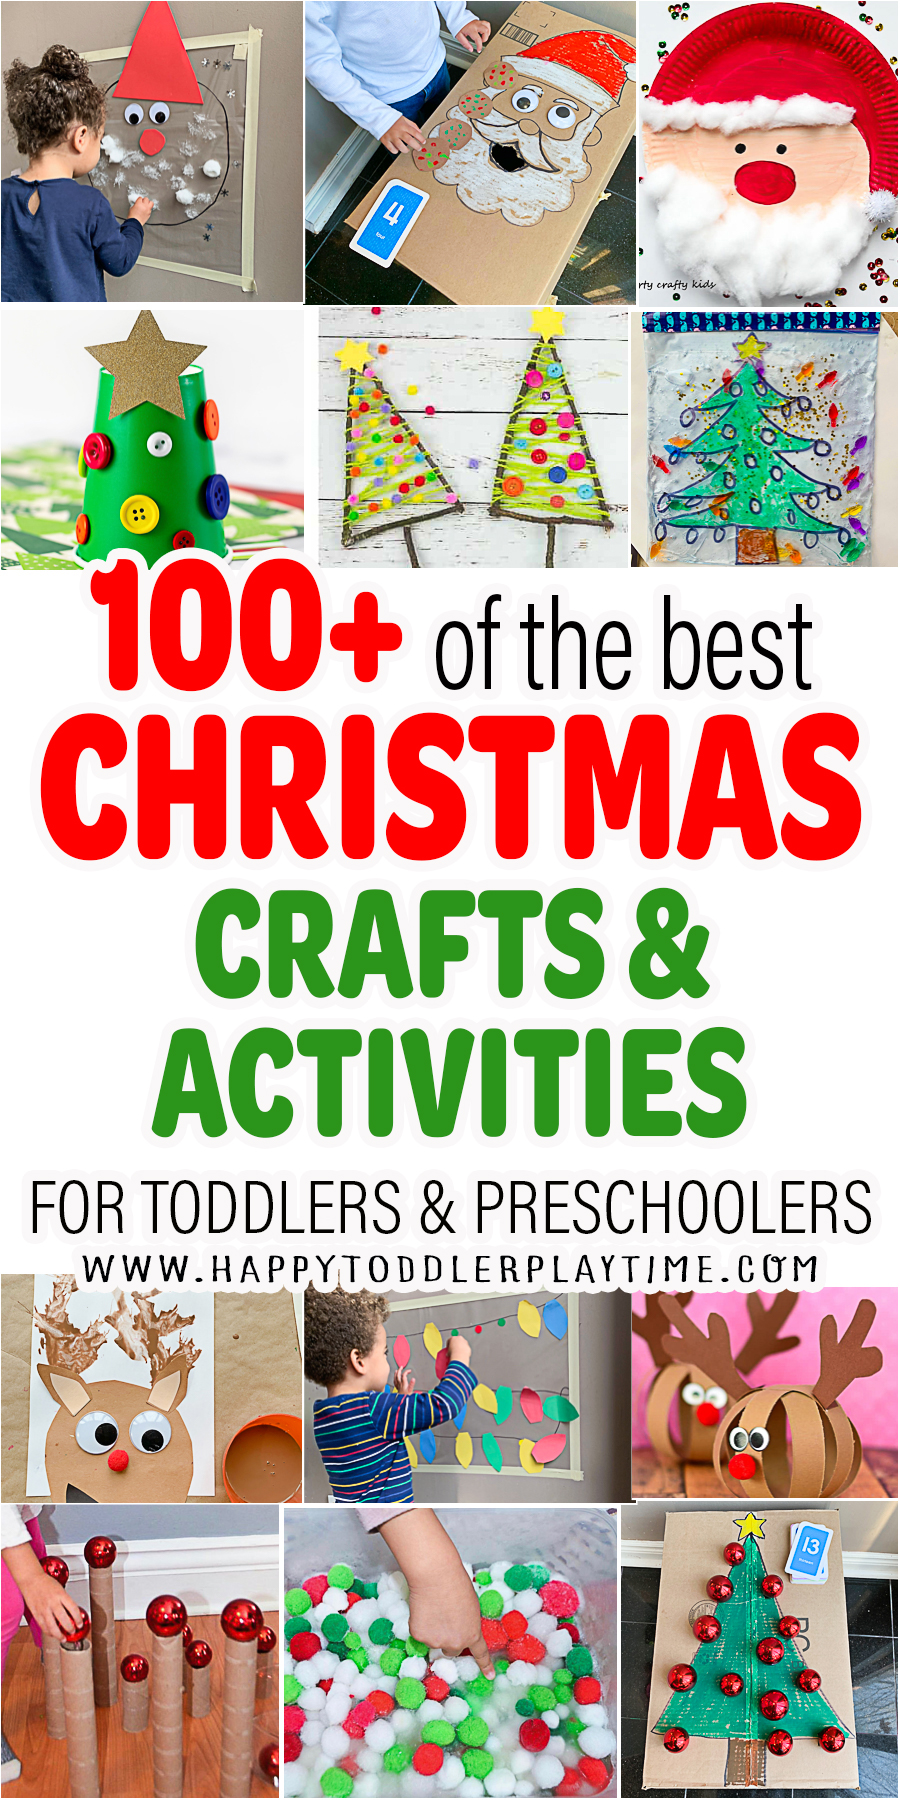


- 100+ of the Best Christmas Activities & Crafts for Kids
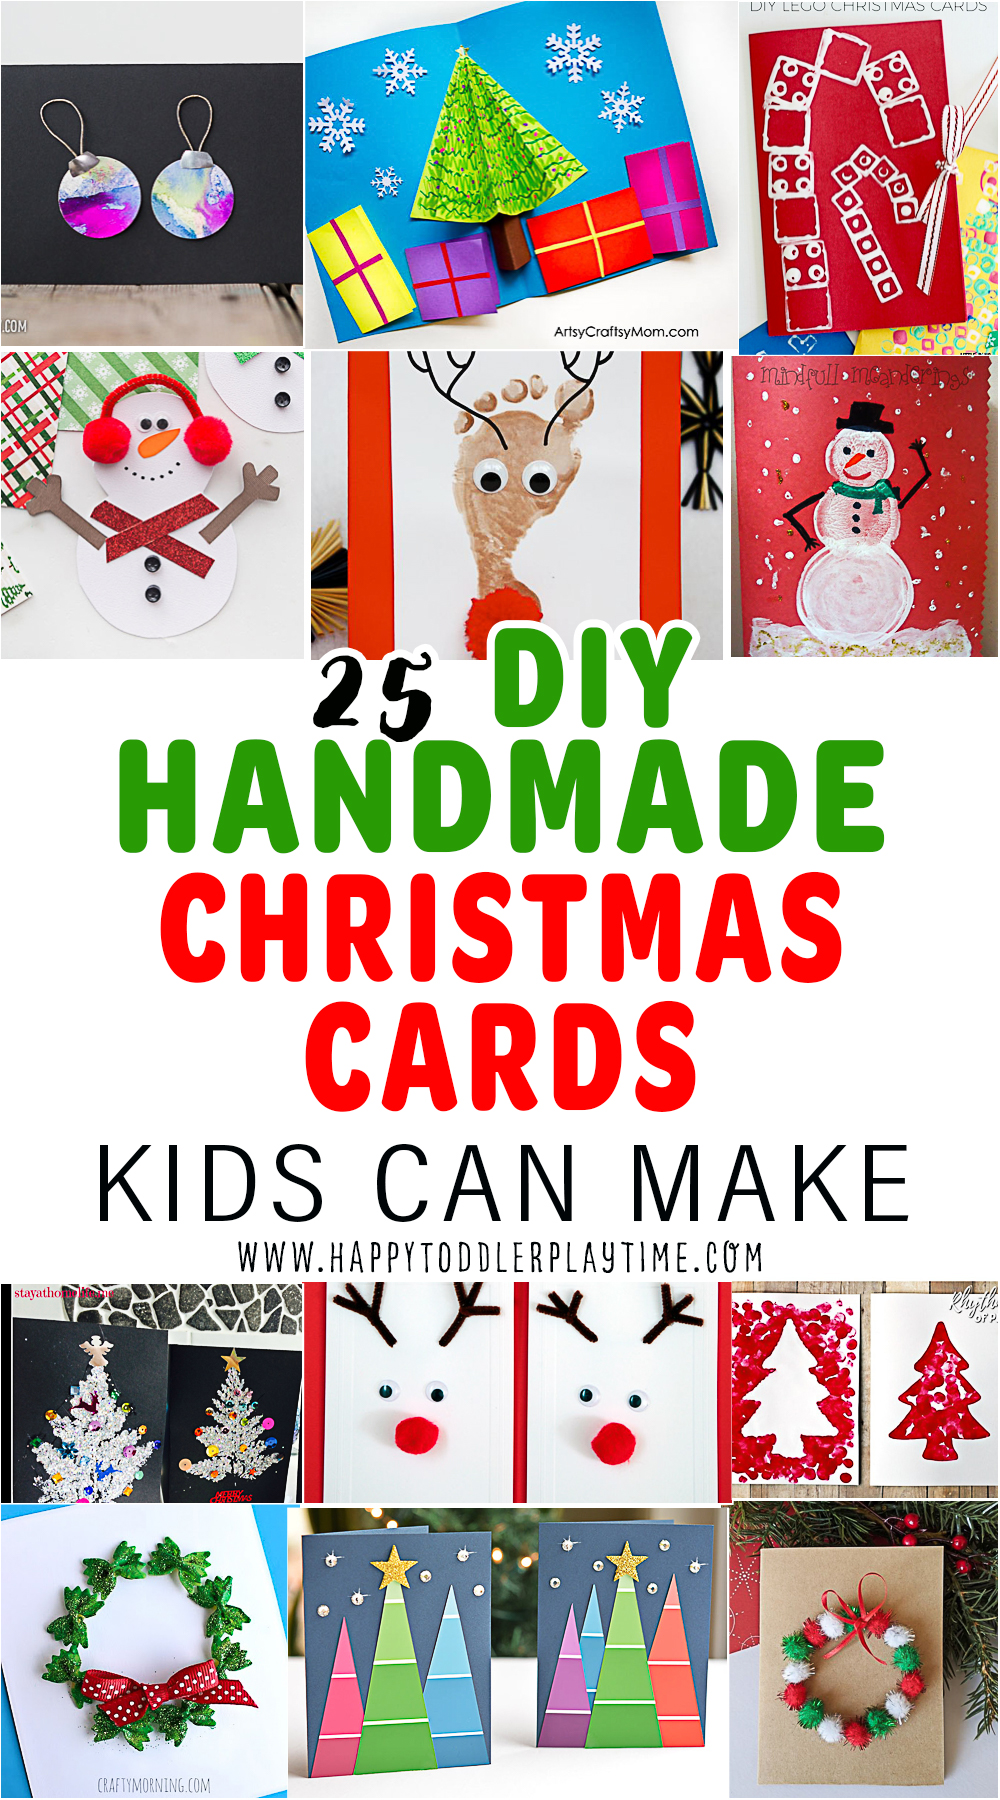
- DIY Handmade Christmas Cards
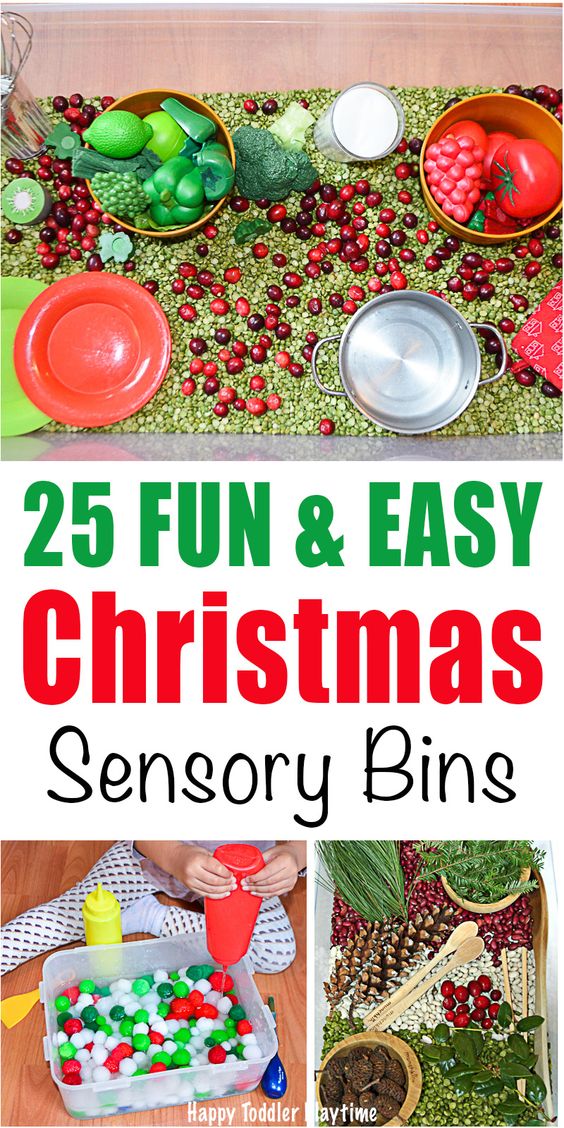
- 25+ Easy Christmas Sensory Bins
- Easy DIY Advent Calendars
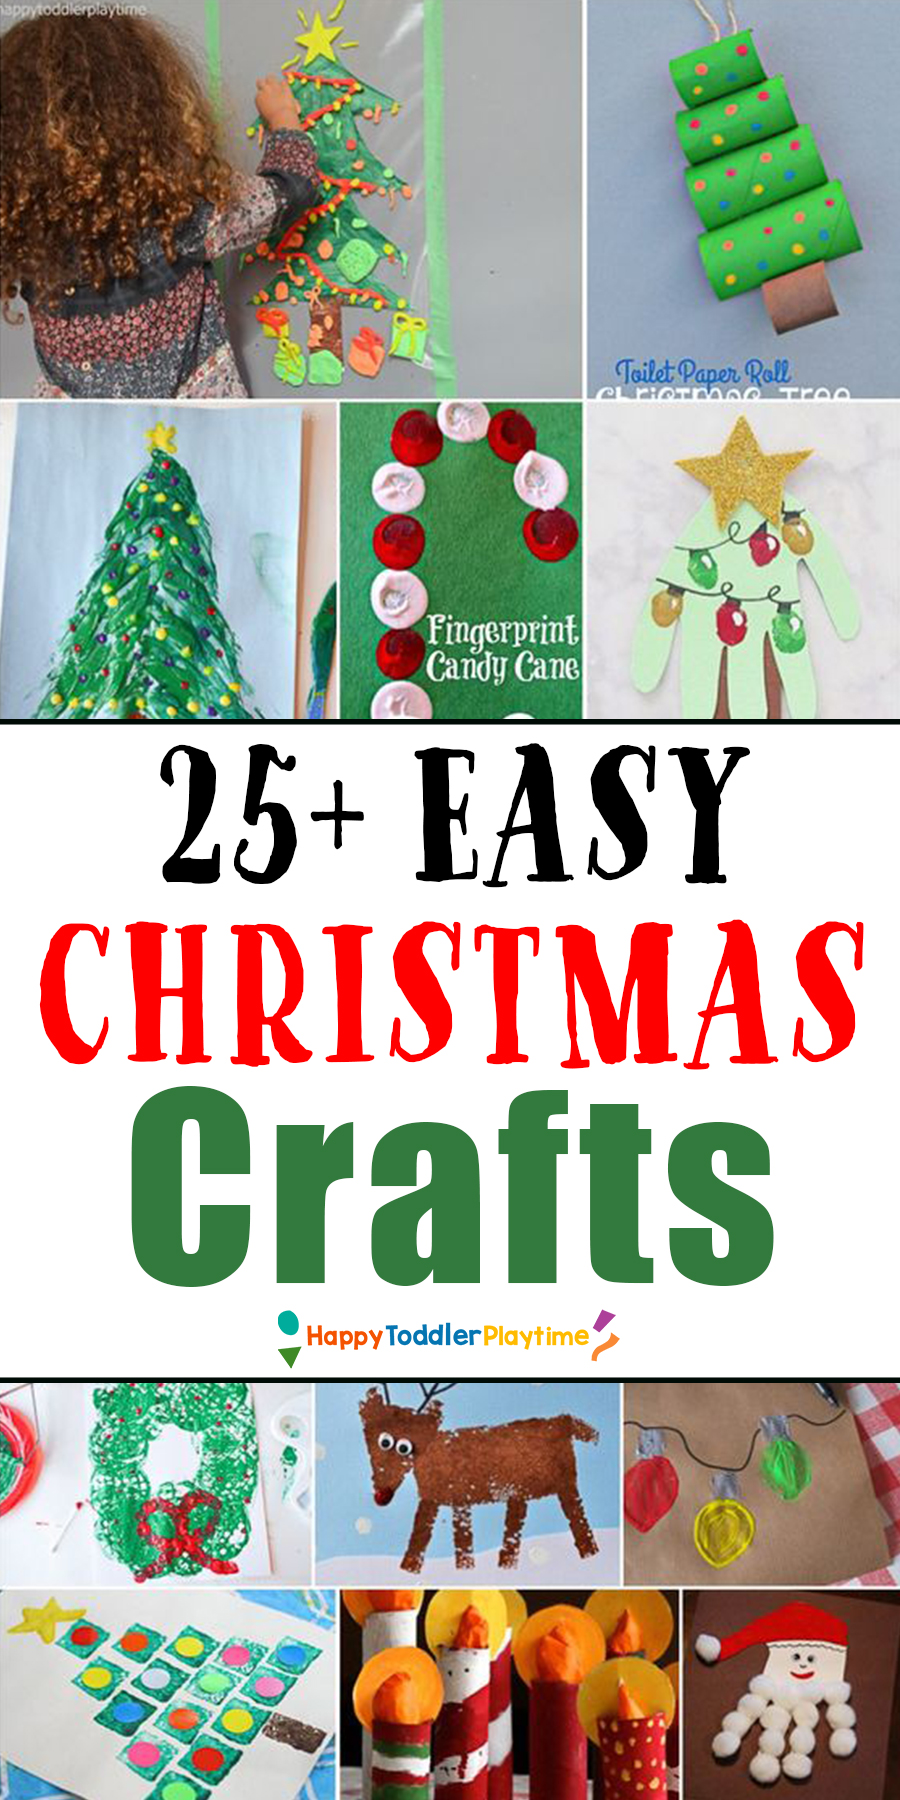
- 25+ Christmas Tree Crafts & Activities
- 24 Christmas Crafts You Can Do Right Now
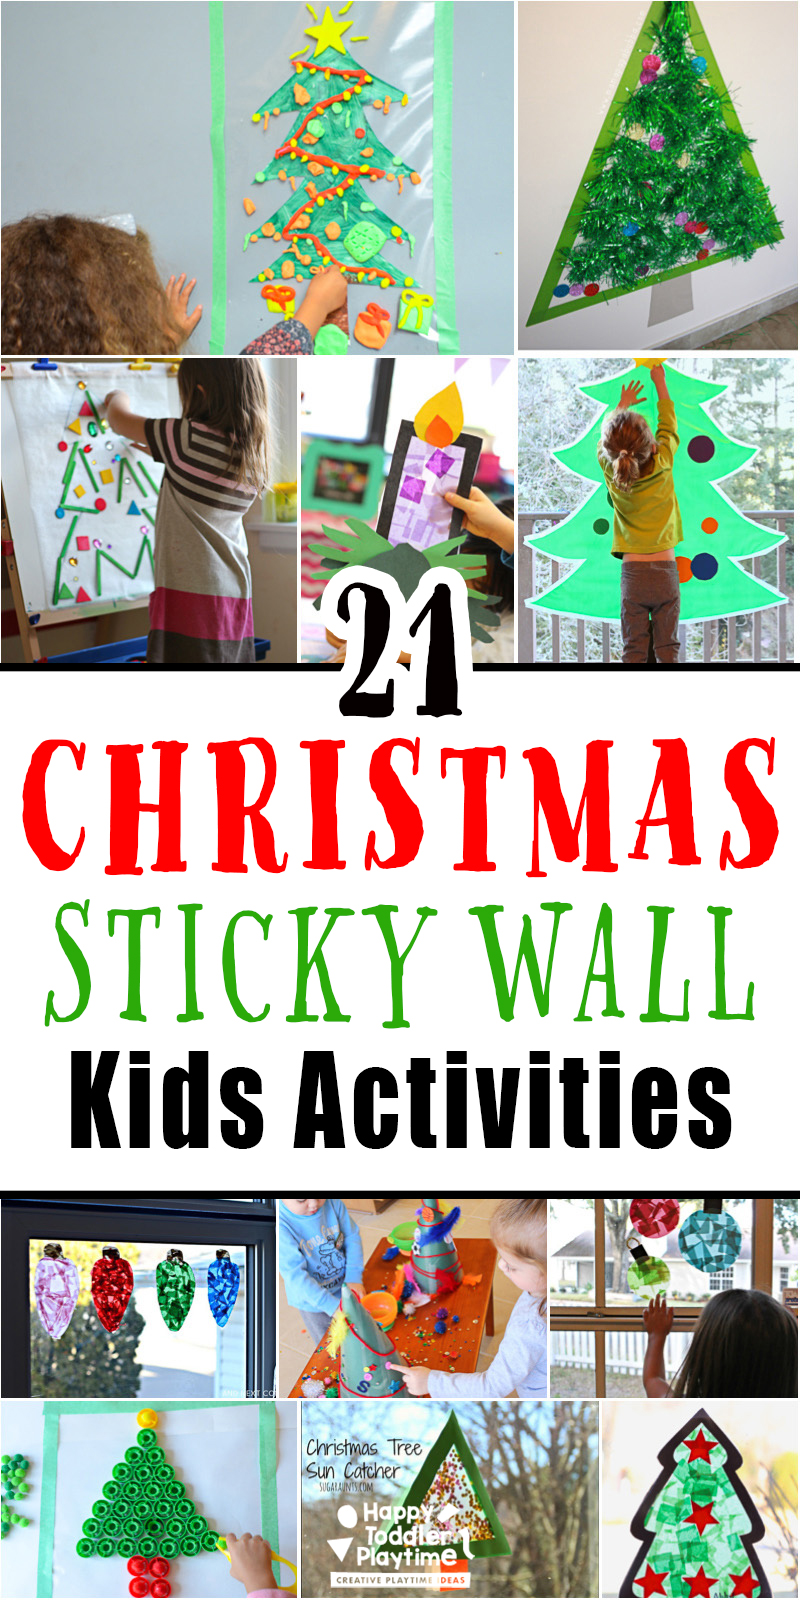
- 21 Christmas Sticky Walls
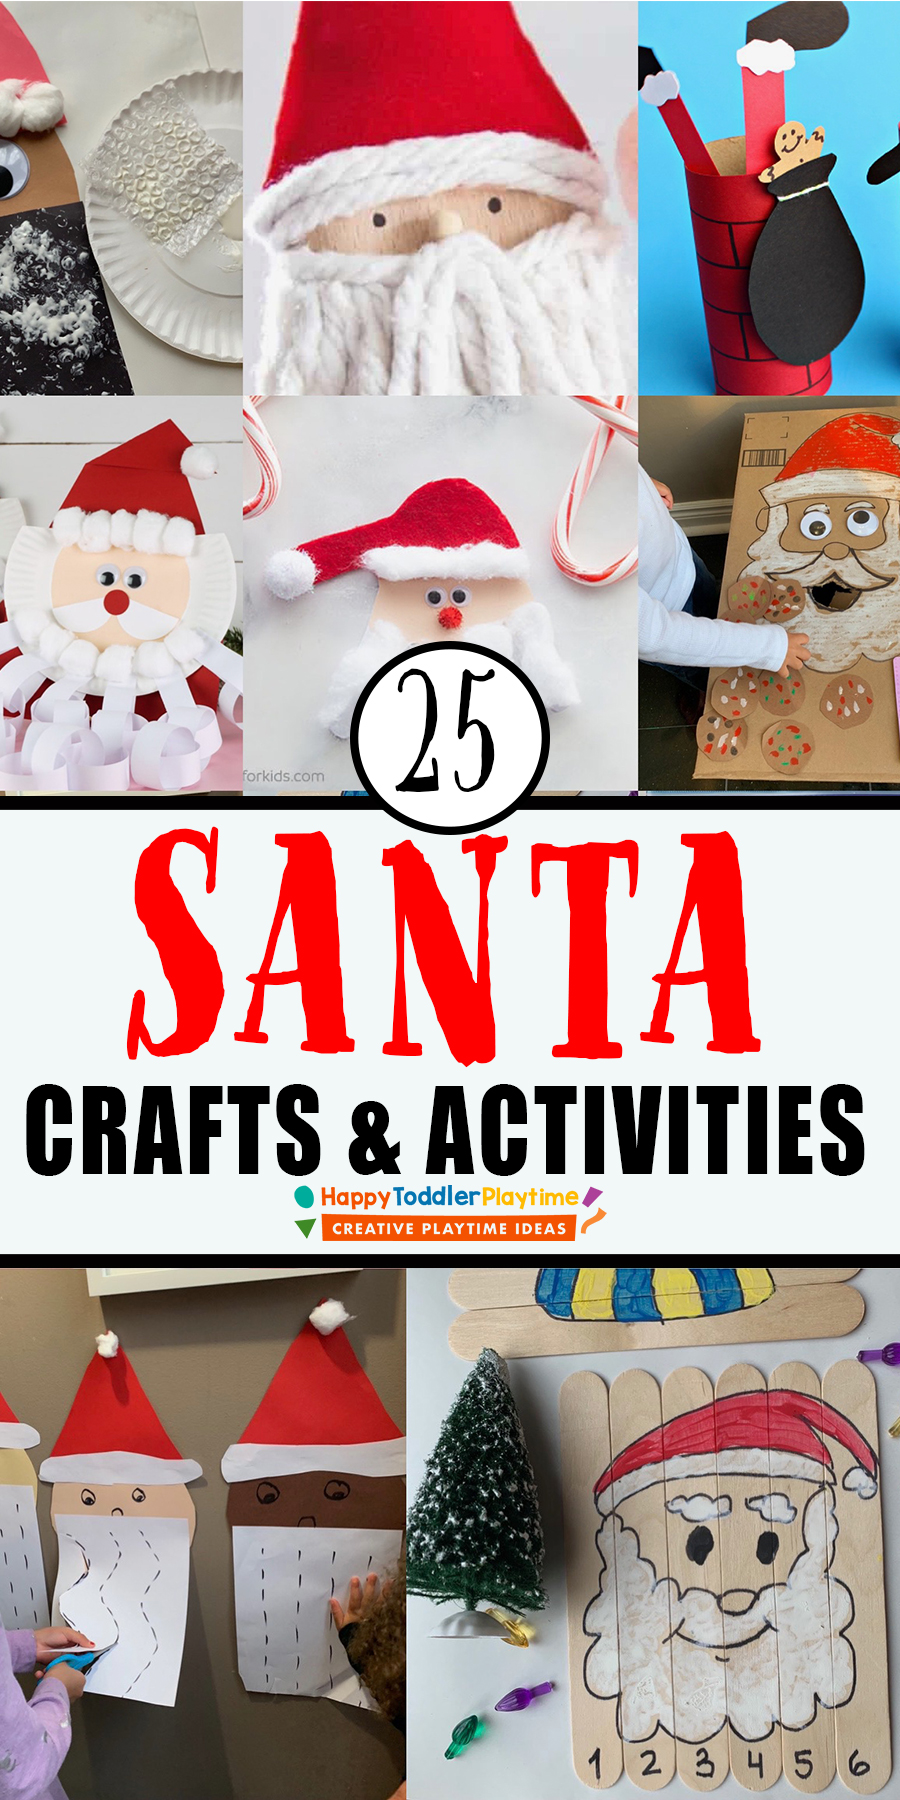
- 25 Santa Crafts & Activities for Kids
- 25+ Christmas STEAM Activities
- 50+ Hanukkah Crafts and Activities
- 30+ Kwanzaa Crafts and Activities
Ways to keep the Mess Down
When it comes to doing activities this Holiday with my kids I like to keep them easy and the clean up even easier. My newest tool of choice are these white serving trays that make doing painting activities and anything mess super easy to clean up.

It’s honestly a game changer for me and my three crafty kids! Ready for the Holiday Cheer to begin?
Christmas Crafts and Activities for Toddlers
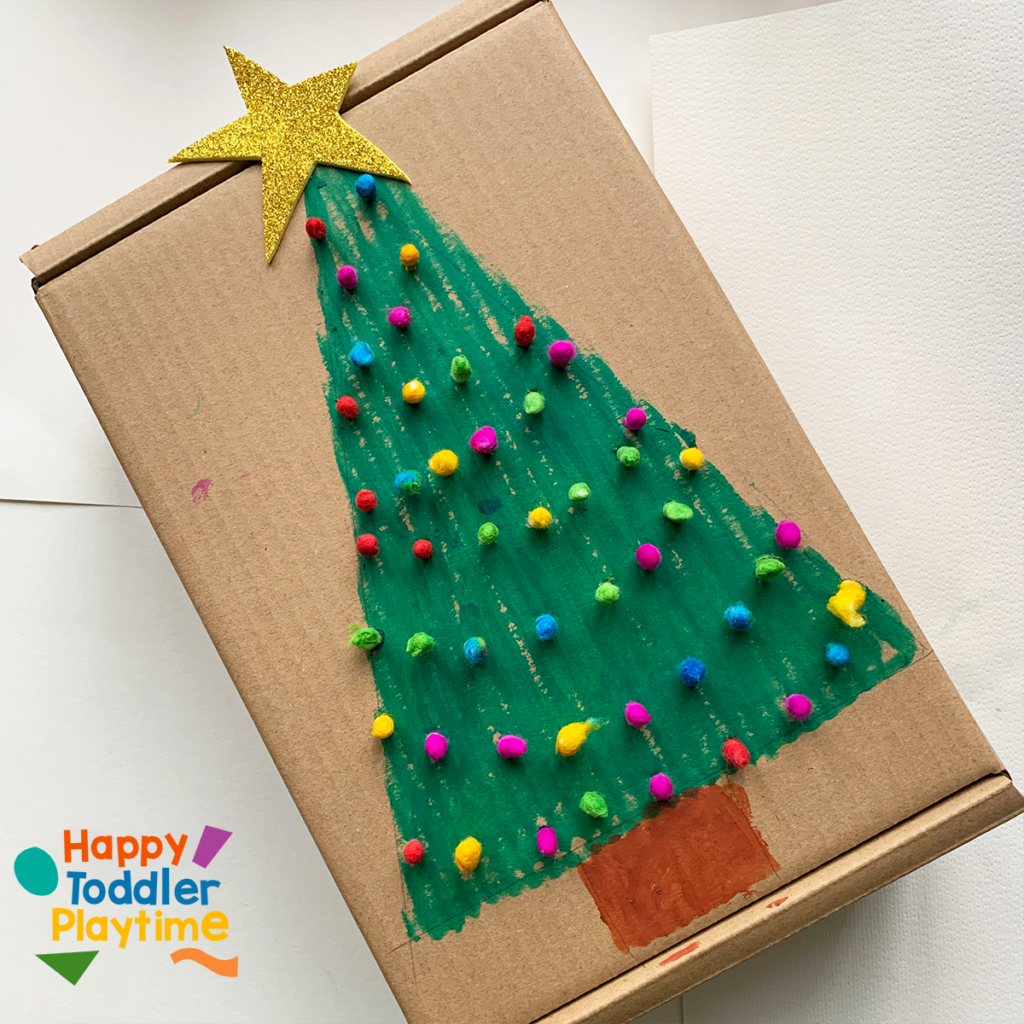
1. Q Tip Christmas Tree Push
Materials
- cardboard box
- paint sticks
- small screw driver
- q-tips
- dot markers
- gold sparkly foam sheets
How to Make a Q-Tip Christmas Tree
- First grab a cardboard box. This activity is best done using a small shoe-sized cardboard box. To create the Christmas tree you can either colour it in yourself or get your little one involved. I used paint sticks. See the supplies section for a link. For the tree I made a simple triangle in green and the stem in brown. This is a great opportunity to talk about shapes with your child and to demonstrate that drawing things can often be broken down into shapes to make it easier!
- Use a small screwdriver or bamboo stick to poke holes all over your Christmas Tree.
- Grab your q-tips and dot markers. Use the dot markers to colour the tips of the q-tips in different colours. I find gthat this is the easiest and simplest way to colour q-tips. Another easy way is to use food colouring but the only issue I have with food colouring is that it takes awhile to dry.
- The final touch will be a golden star. I used sparkly foam sheets that are self adhesive on the back. I drew the shapee of a start on the paper backing and cut it out. See below for a link.
- Cut the q-tips in half and place them in bowl. You are almost ready!
How to Play
Invite your child to post the q-tips into the holes. So simple and so engaging for a toddler!
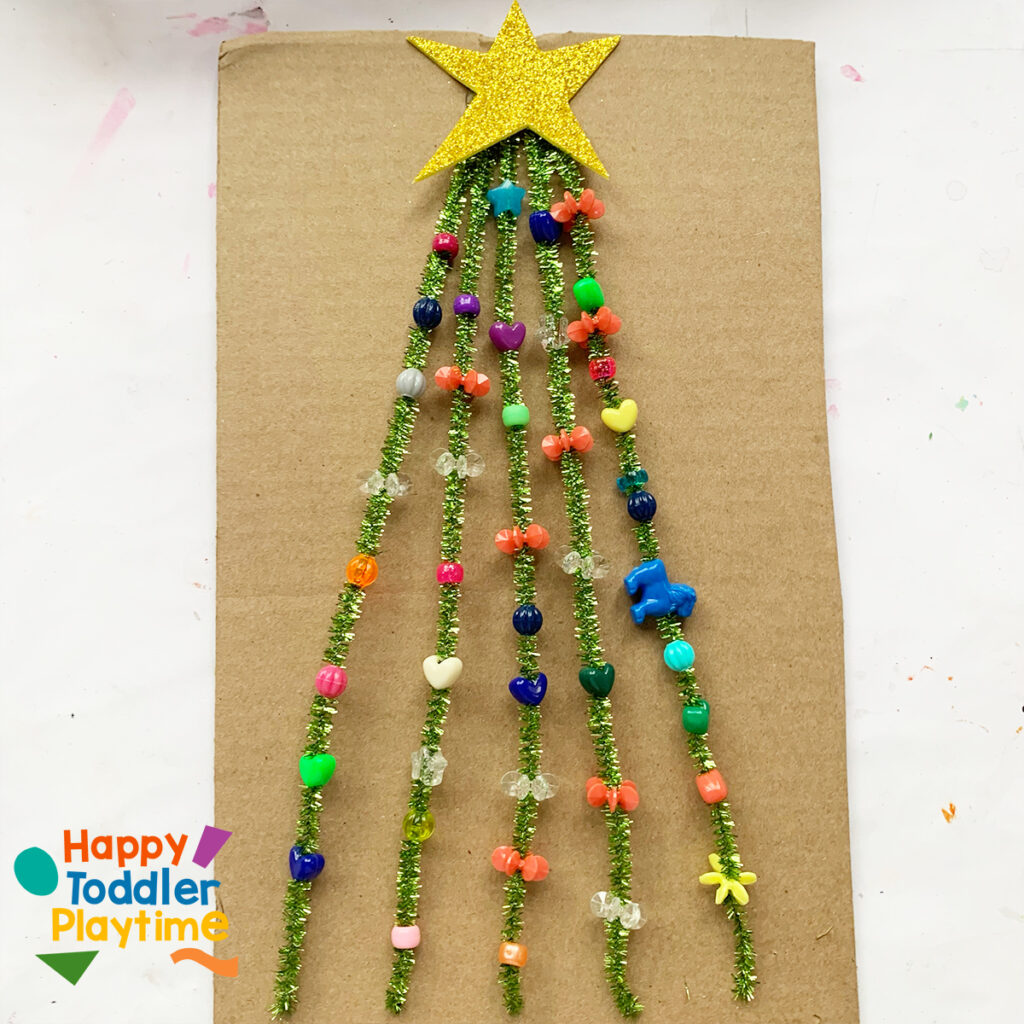
2. Pipe Cleaner Christmas Tree
Materials
- Pipe cleaners
- Carbboard
- Pony beads or coloured pasta or wooden beads
- Sparkly foam sheets or yellow construction paper
- Hot glue gun
How to Set Up
- Grab a peice of cardboard and 4-5 pipe cleaners. If your child is using pasta add a few more, if they are using beads add a few less.
- Grab your hot glue gun and squeeze out a large dollop at the top of your piece of cardboard. Stick one end of each pipe cleaner into the glue and press down. Continue adding them close together in one point so that they form a triangle going down.
- Cut out a star from yellow construction paper or foam sheet or if you have it sparkly gold foam sheets. I have foam sheets that are self adhesive which is helpful otherwise you can stick the star over the pipe cleaners ends in the glue. Make the star large enough that it covers all the pipe cleaners at the top of the tree.
How to Play
Invite your little one to thread pony beads, wooden beads or coloured penne pasta along the pipe cleaners to decorate the Christmas tree.
Once each strand is done you can poke the end of the pipe cleaners into the cardboard to keep the beads from coming off. You can also invite your child to decorate the background of the tree with snowflakes or paint. You can use a Q-Tip and white paint to make small snowflakes.
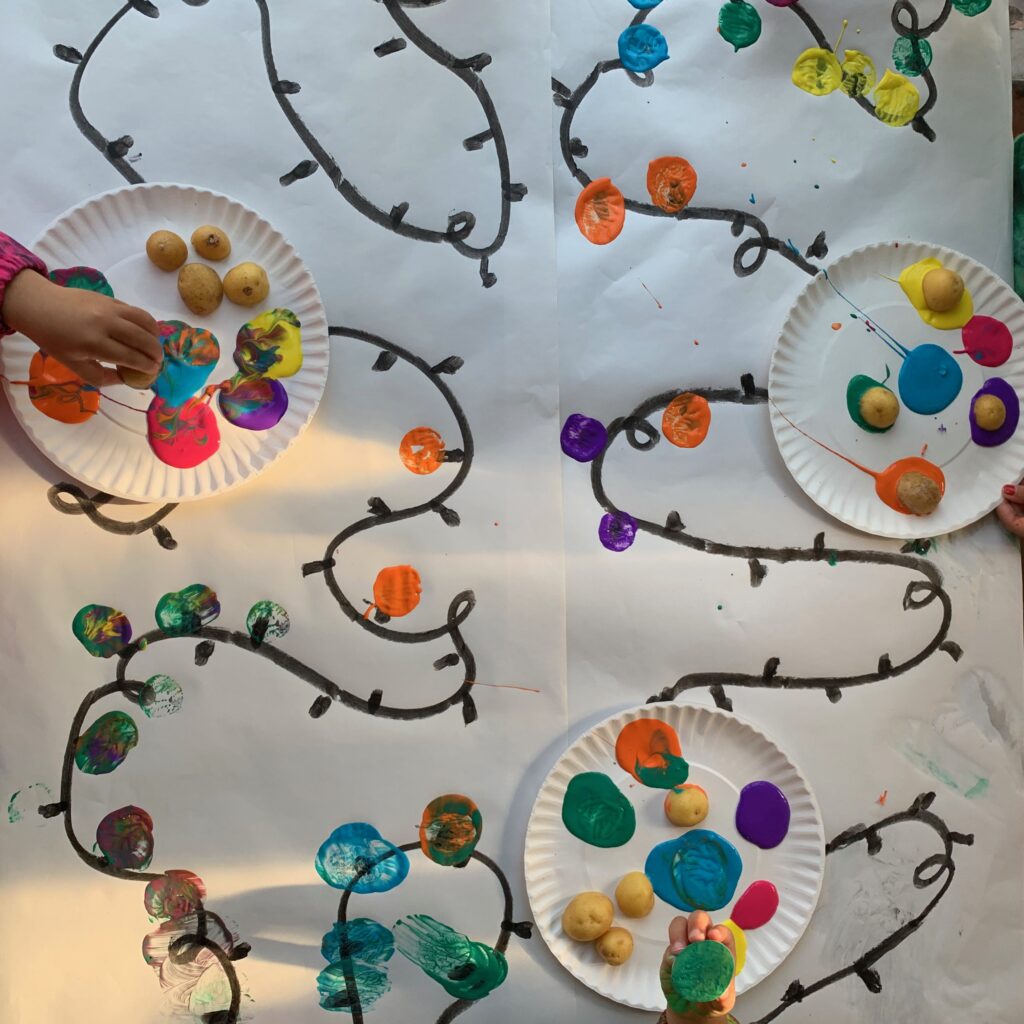
3. Potato Christmas Lights
Materials
- White Kraft Easel Paper
- Black Paint Stick
- Washable Finger Paints
- Mini Potatoes (or wine cork or Pom poms)
- Paper Plates
How to Set Up
- Grab your white Kraft paper and cover your table or floor with it. Take your black paint stick (you could also use a black sharpie for this part) and draw a string of Christmas lights. Include small sockets where your little one is going to stamp the mini potatoes or Pom poms or finger prints or wine corks.
- Pour a small amount of each colour you want to use on to a paper plate. Cut mini potatoes in half and arrange them beside each colour. Although I would have liked my toddlers to use a new potato for each colour, this of course was not the case. They often ended up mixing the colours which was fine and gave us an opportunity to talk about what new colours they were making.
- Show your little one where to stamp the potatoes to create the light bulbs, at the end of the light bulb socket your created. Then let them loose.
How to Play
Before they used their work as a sensory painting activity, I was able to save enough of their Christmas light painting to use it as wrapping paper for the handmade gifts they make for their grandparents!
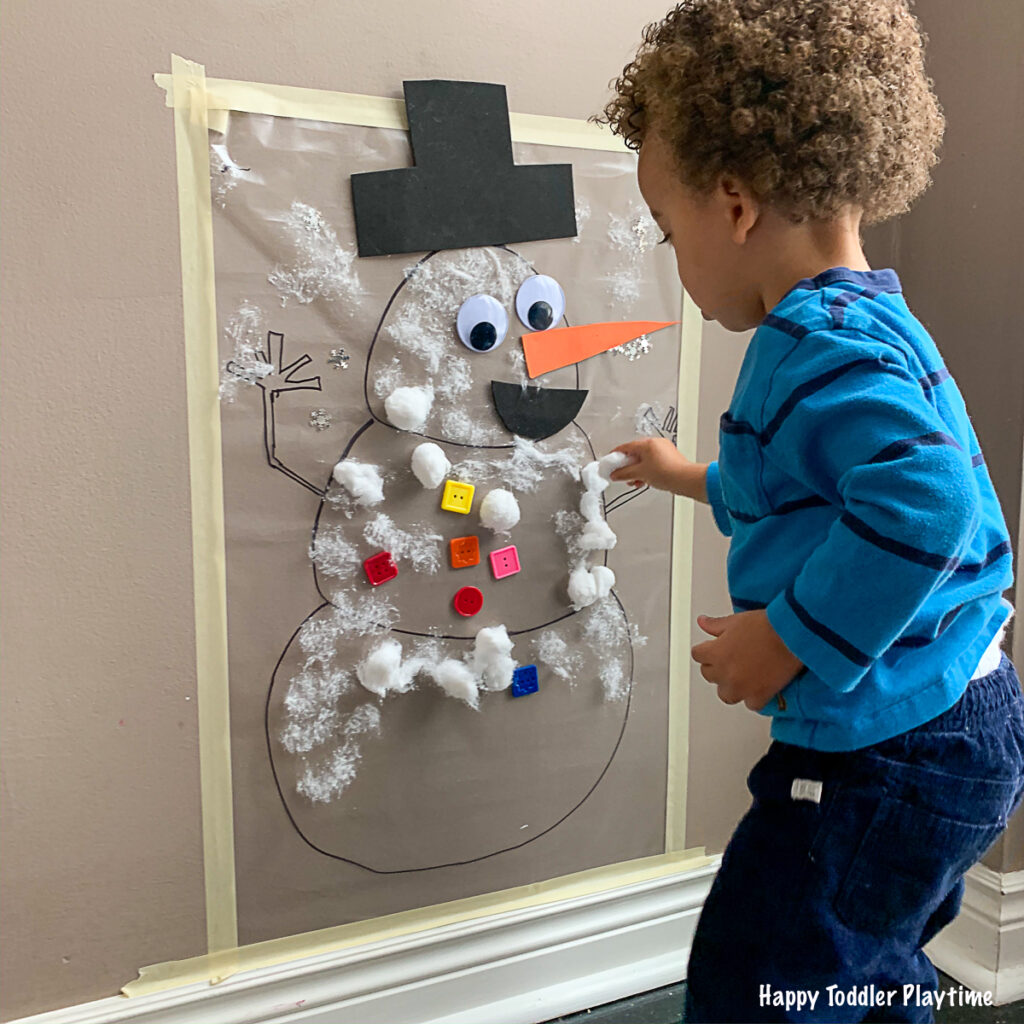
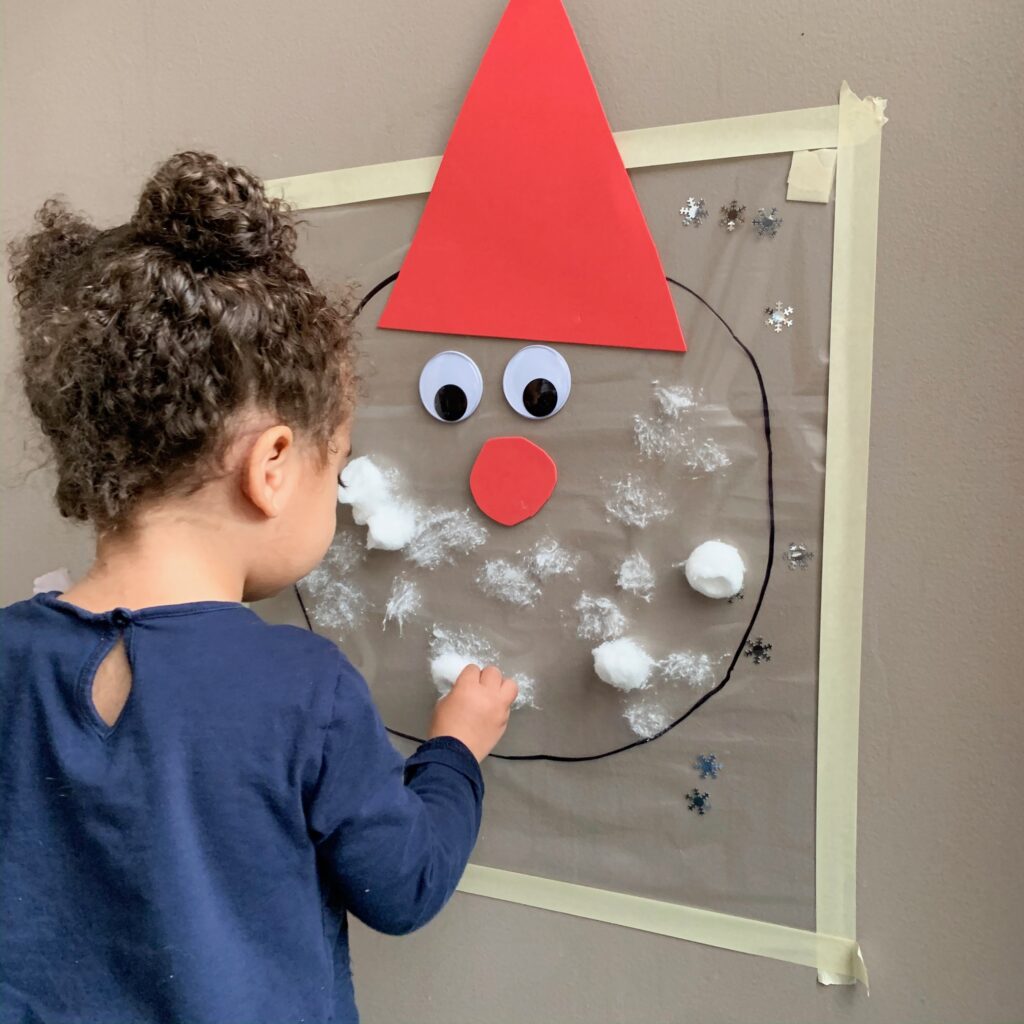
4. Snowman Sticky Wall
READ MORE… 60+ AWESOME CONTACT PAPER ACTIVITIES
Materials
- Con-Tact Paper
- Masking Tape
- Cottons Balls
- Snowflakes
- Buttons
- Giant Googly Eyes
- Black Sharpie
- Orange and Black Foam Sheets
- Scissors
How to Set Up
- Grab your orange and black foam sheets paper and scissors. Cut out a carrot nose, a top hat and a smile mouth for your snowman.
- Unroll your contact paper and draw the outline of a snowman using a black sharpie on the back of the sticky wall (not the side with the paper backing). Tape your contact paper snowman up on a wall or window with the sticky side facing out.
- Set out your cotton balls, buttons, snowflakes and google eyes, nose, hat and mouth in a way your little one can easily access it. I used a plastic appetizer tray.
How to Play
Invite your little one build a snowman. Add the eyes, hat, nose and mouth first before adding the cotton ball snow. Once the cotton balls go on the sticky wall it will be harder to stick anything else up. Next add the buttons.
Finally its time to add the cotton ball snow! Let your little one use the cotton balls to dap snow on the snowman.
5. DIY Christmas Tree Puzzle
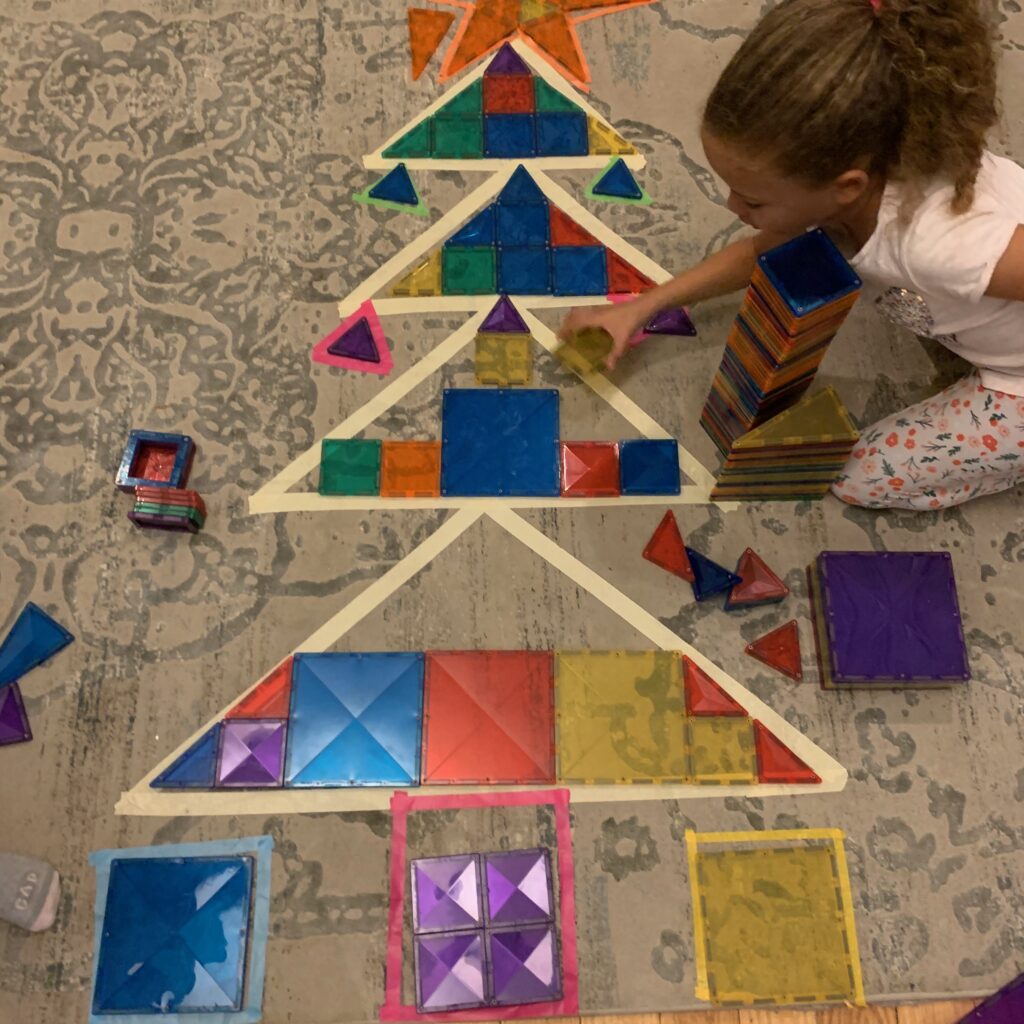
READ MORE… 25 MAGNETIC TILES ACTIVITIES
Materials
- Painter’s Tape or Washi Tape
- Connectix Magnetic Tiles
How to Set Up
- Take your painters’ tape or masking tape or even washi tape and create the triangle branches of your Christmas tree. You can also create a start at the top of the tree, square presents under the tree and triangle decorations hanging from the tree.
How to Play
Invite your child to use the Connectix Magnetic Tiles to fill in the spaces inside the painters tape. This is a great activity for building and developing problem solving and fine motor skills.
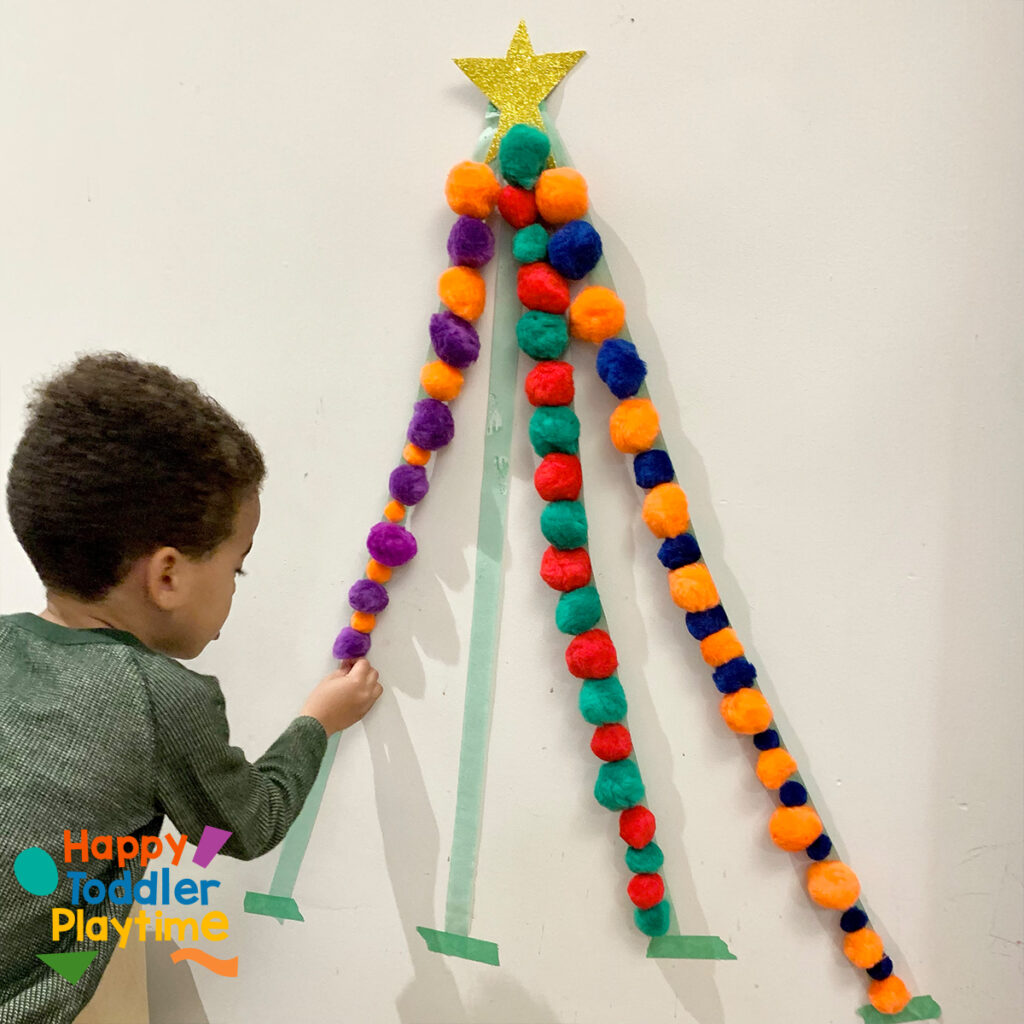
6. Pom Pom Christmas Tree
Materials
- Green Painter’s tape
- Pom Poms
- Yellow construction paper or foam sheets
How to Set Up
- Create a tape triangle. Place a piece of tape on the wall. Use this as your anchor to hold up the tape lines of the tree.
- Create 4-5 tape lines with the sticky side of the tape facing out. Anchor the tape line at the top the piece of tape you put there initially.
- Place another piece of tape on the bottom of each line to secure it.
- Cut out a star from construction paper or foam sheet and stick it on top of the tree using painter’s tape.
How to Play
Invite your child to stick colourful Pom Poms on the tape to decorate the tree. For older children have them create patterns with the Pom Poms.
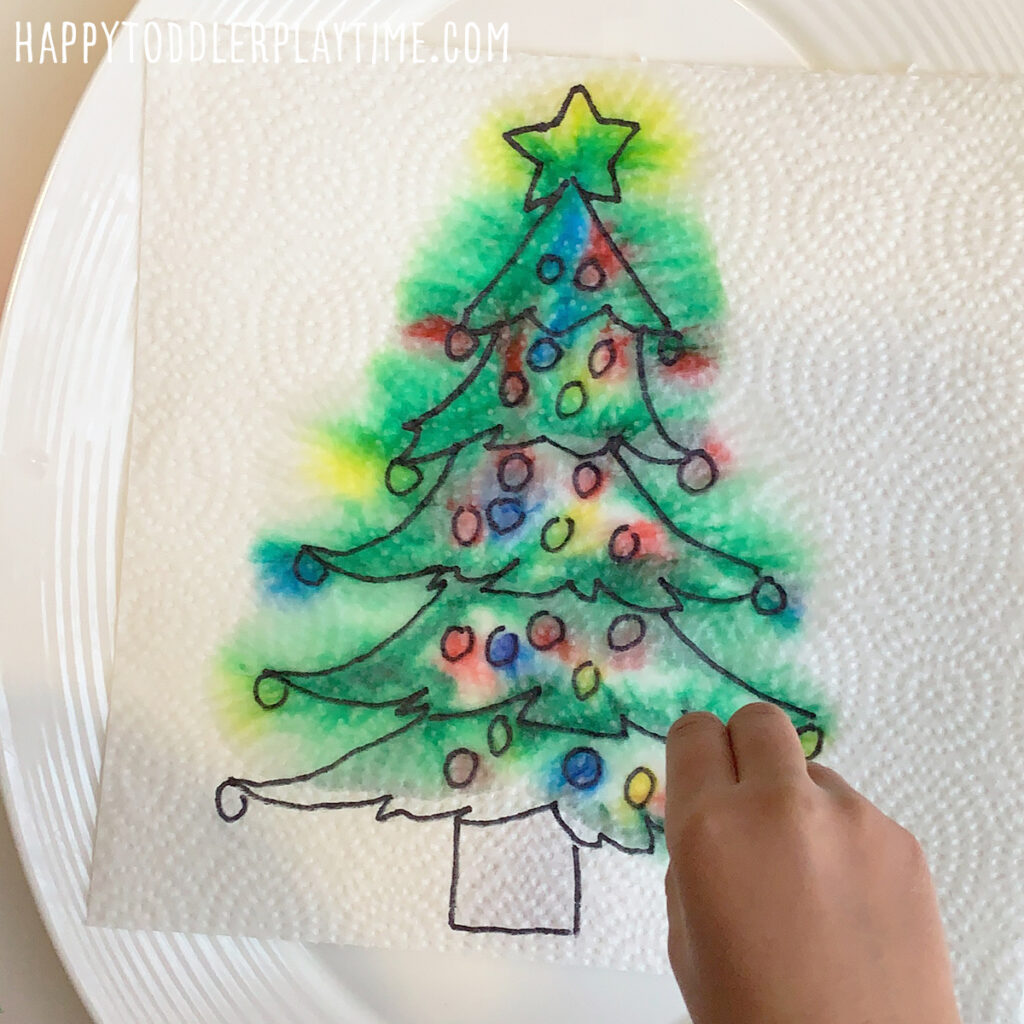
7. Paper Towel Surprise Christmas Tree
Materials
- Paper towel
- Black Permanent Mark
- Washable Markers
- Jumbo Colorful Eyedropper
- Bowl or glass
- Dinner Plate or baking sheet
- Water
How to Set Up
- Lay another sheet of paper towel on top of your tree drawing and trace the outline of the tree on the top sheet using a black permanent marker such as a sharpie.
- This is the tricky part. As you draw the outline you will need to see the tree that you drew on the bottom. An easy way to do this, is put your two sheets of paper towel up to a window so that you can see the coloured tree on the bottom. Draw the outline of it on the top sheet.
- Place your paper towel drawing with the permanent marker side up on a baking sheet or larger dinner plate.
How to Play
If this is the first time your little one is using an eye dropper, I suggest practicing using it before starting the activity.
Once they get the hang of it, invite them to drop water onto their Christmas Tree and to watch the colour come through and the decorations light up!
8. Frozen Pom Pom Sensory Bin

Materials
- Pom Poms
- 41 Qt, Clear Sensory Bin (Large) or a IKEA FLISAT Children’s Sensory Table
- Ikea Trofast Toy Storage Box White, Medium
- Large plastic container
- Squeeze Bottle
- Paint Brush
- Colourful Bowls
- Towel
How to Set Up
Put your pom poms into a small sensory bin or plastic container that will fit into your freezer, add water and let them soak. I let mine soak for a few hours simple because I forgot about them but about 10-15 minutes should be enough. I did not completely cover the pom poms in water. The ones on the bottom were submerged but the ones on the top were not. I just made sure that they were all good and soaking wet before I put them into the freezer over night.
How to Play
I grabbed some squeeze bottles filled them with warm water, and handed her a paint brush and other tools.
She squeezed the warm water onto the pom poms and them used the brush and tools to work them out.
Put a towel down and save yourself having to clean up water from the floor or table.
9. How to Make Fake Snow
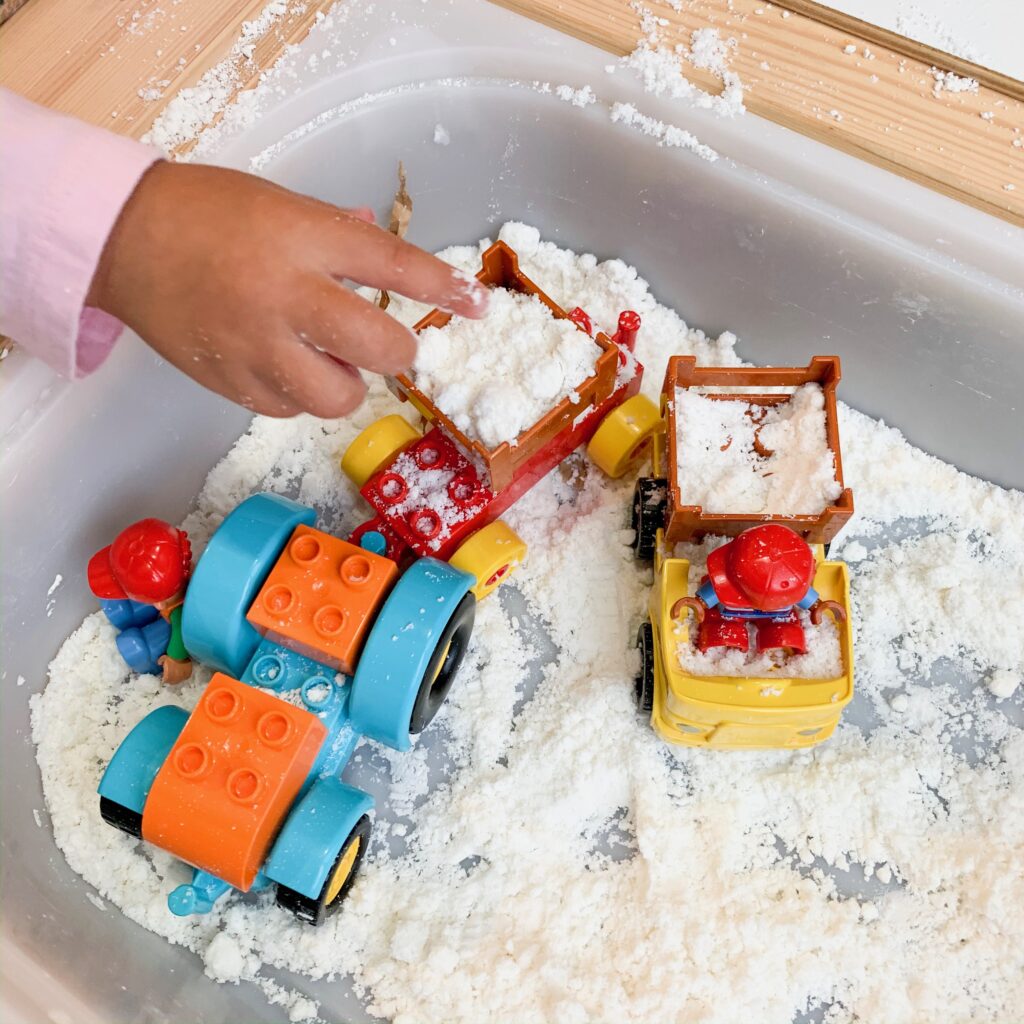
Materials
- 1 Cup Shaving Cream
- 1 Cup Baking Soda
How to Set Up
1. Combine the two ingredients in a bowl until they are the consistency of wet snow.
How to Play
Place the fake some in a sensory bin and add plastic trucks, bowls, and shovel.
10. Cotton Pad Christmas Wreath
11. Black Glue Christmas Lights
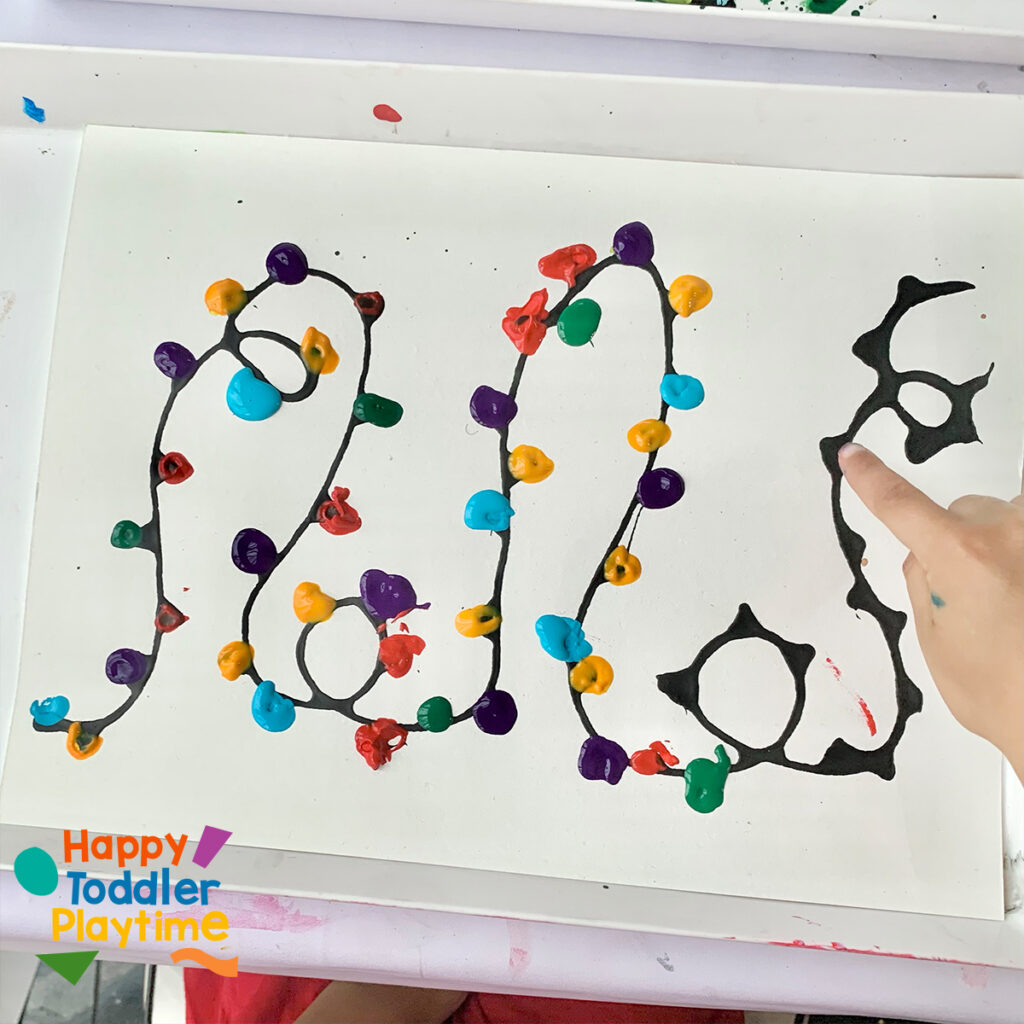
Materials
- Black paint
- White school glue
- washable finger paints in various colours
How to Set Up
- Pour of about 1/4 of the white school glue from the bottle and replace it with black paint.
- Shake the bottle well and mix with a bamboo stick. Replace the nozzle.
- Take a piece of white cardstock trace a line of christmas lights with a pencil
- Invite your child to trace the line with the black glue . Set it aside to dry. It may take a few hours so either start this activity in the morning and finish in the afternoon or start in the evening and finish in the morning.
- Pour out some washable finger paints in various colours.
- Invite your child to stick their finger in one color and create Christmas lights at various spot on the string of lights.
- Continue using different colours.
12. Hot Chocolate Name Craft
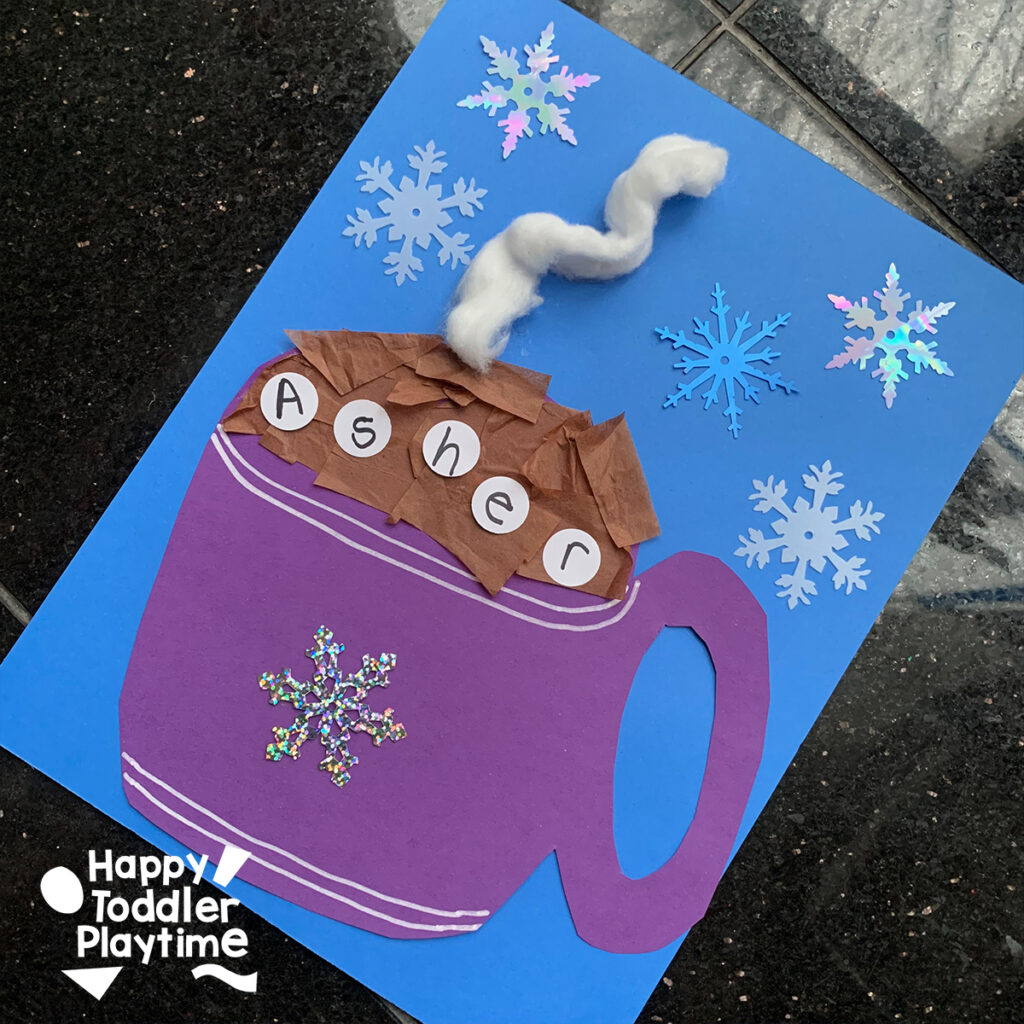
Materials
- Blue, white and another colour of your choice construction paper
- Brown tissue paper
- Glue
- Cotton ball
- Scissors
- Snowflakes
- White pencil crayon
How to Set Up
- Cut out the shape of a mug from a sheet of construction paper. You can let your child choose their favourite colour for their mug. Glue it to another sheet of blue construction paper.
- Cut brown tissue paper into small squares and invite your little one to fill their empty mug with hot chocolate by gluing the tissue paper to the top part of the mug. You can draw an oval at the top to help guide them.
- For the marshmallows, cut out the number circles that corresponds to your child’s name and write the letters of their name on each circle. Invite them to glue them down as marshmallows on top of the brown tissue paper.
- Take a cotton ball and if you can unwrap it to create the steam coming off the cup of hot chocolate. Glue it down above the cup. If you can unwrap the cotton ball simply glue several cotton ball on the top as steam.
- Invite your little one to glue snowflakes on and around the mug as decoration. Let them also use a white pencil crayon to decorate their mug!
13. Cotton Ball Christmas Tree
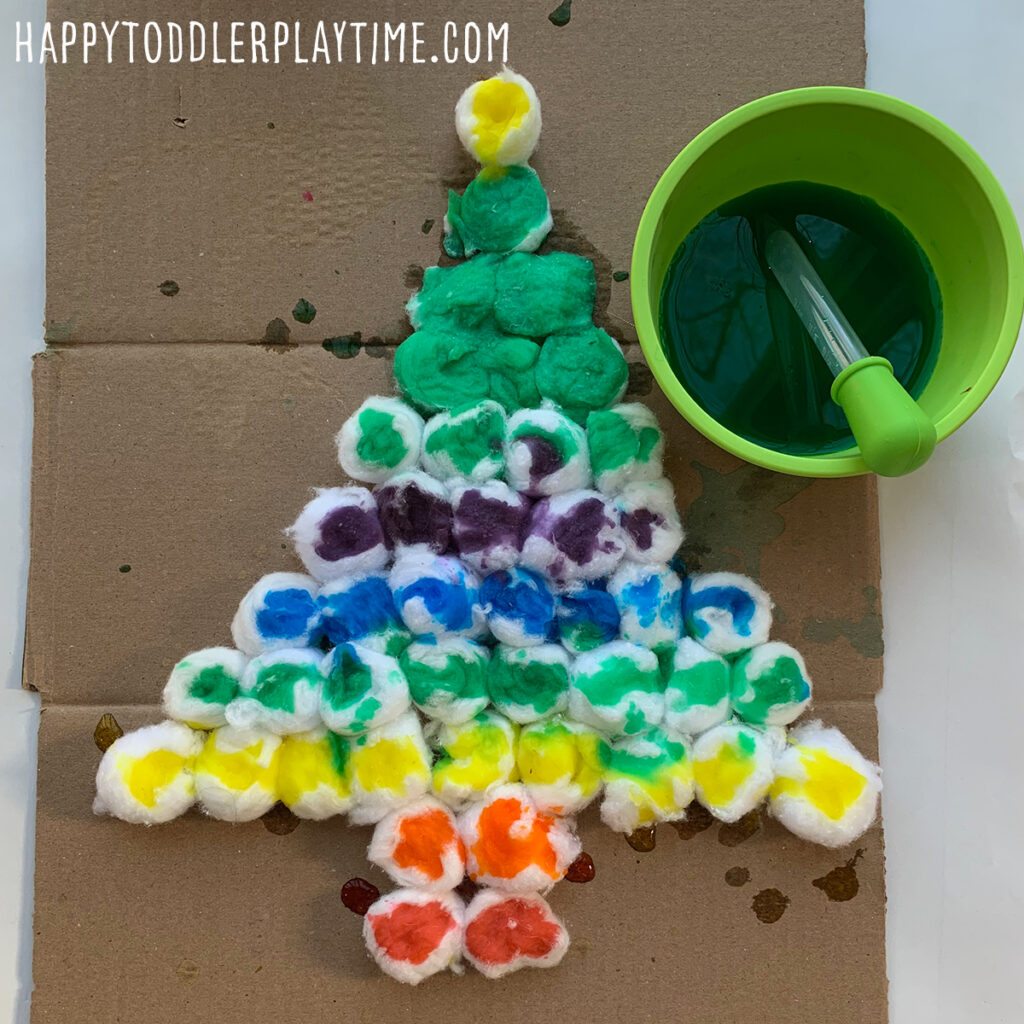
Materials
- Cardboard
- Scissors
- Pencil
- Cotton Balls
- Glue
- Eye Droppers
- Food Colouring
- Bowls or glasses
- Water
How to Set Up
- Grab a piece of cardboard, your glue and lots of cotton balls. Draw a rough outline of a Christmas Tree on your cardboard using a pencil.
- Next, glue down you cotton balls over your drawing in the shape of a Christmas Tree similar to the photo referent above.
- If this is the first time your little one is using an eye dropped I suggest practicing using it with just water before adding the colour.
- Once they get the hang of it add the colour to the water. Grab six bowls or glasses and fill them half way with water. Add a few drops of different food colouring into each container. We did all the colours of the rainbow from red to purple.
How to Play
Invite your child to using the droppers to colour the cotton balls and create a rainbow Christmas Tree!
There will be some mess. This is indeed a messy activity. The good news is that the cardboard will catch and absorb most of the mess. Make sure to use a piece of cardboard large enough to hold the christmas with some room on the ends to catch any run off.
14. Post-It Christmas Tree
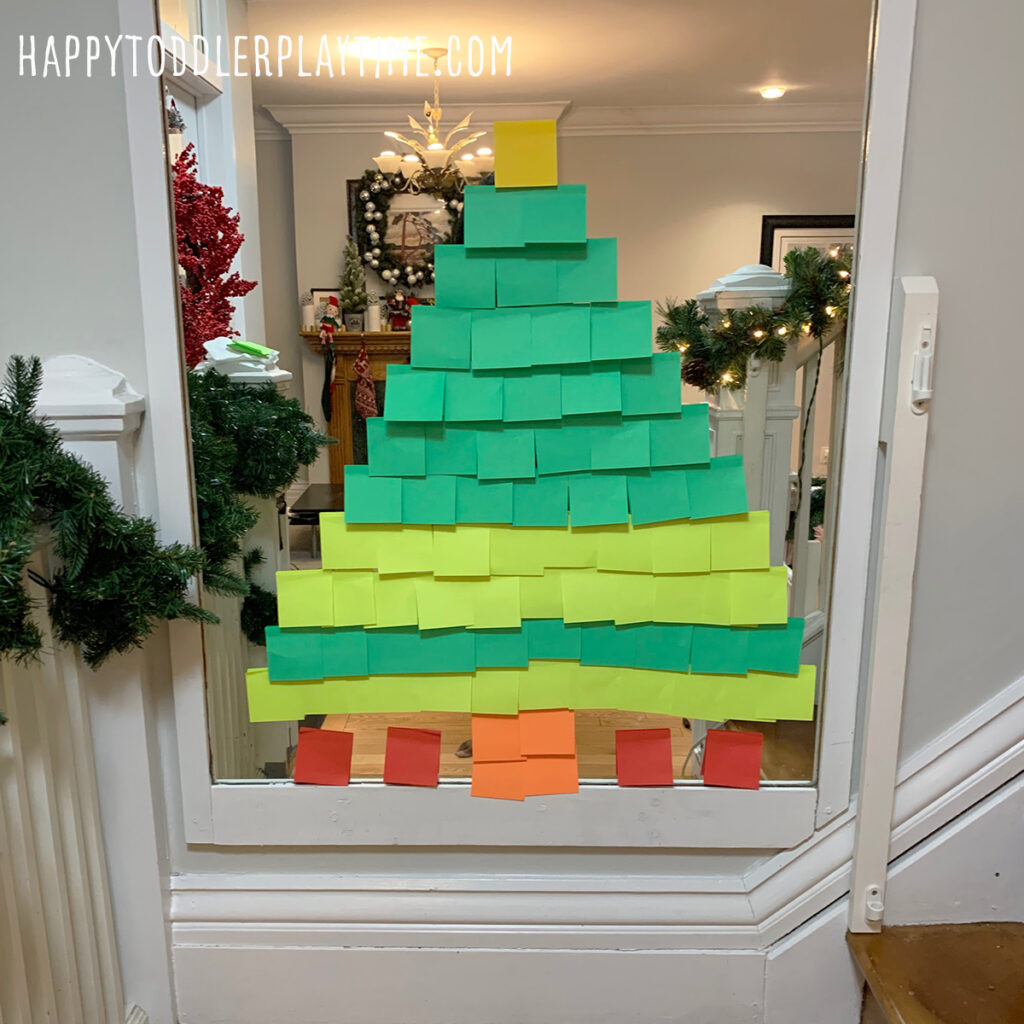
Materials
- Green and yellow Post It notes
- Washable Markers
- Washable Dot Stickers
- Stickers
How to Set Up
- Create a Christmas Tree using post it notes. I created mine on a mirror but you can easily create this on a wall.
How to Play
Next its time to let your little one to decorate your tree. To ensure that your walls stay clean make sure to use washable markers. You can also protect your walls by taping up newsprint or butcher paper on the wall and creating the Christmas Tree on top of it.
To decorate the tree use regular or holiday themed stickers, washable markers and dot markers. Let your little ones draw decoration, presents and ornaments.
Have bigger kids write out fun Christmas messages or lines from their favourite Christmas carol. Leave it up as part of your decorations or take it down in a few days once your little one has decorated it all!
15. Puffy Paint Christmas Tree Craft
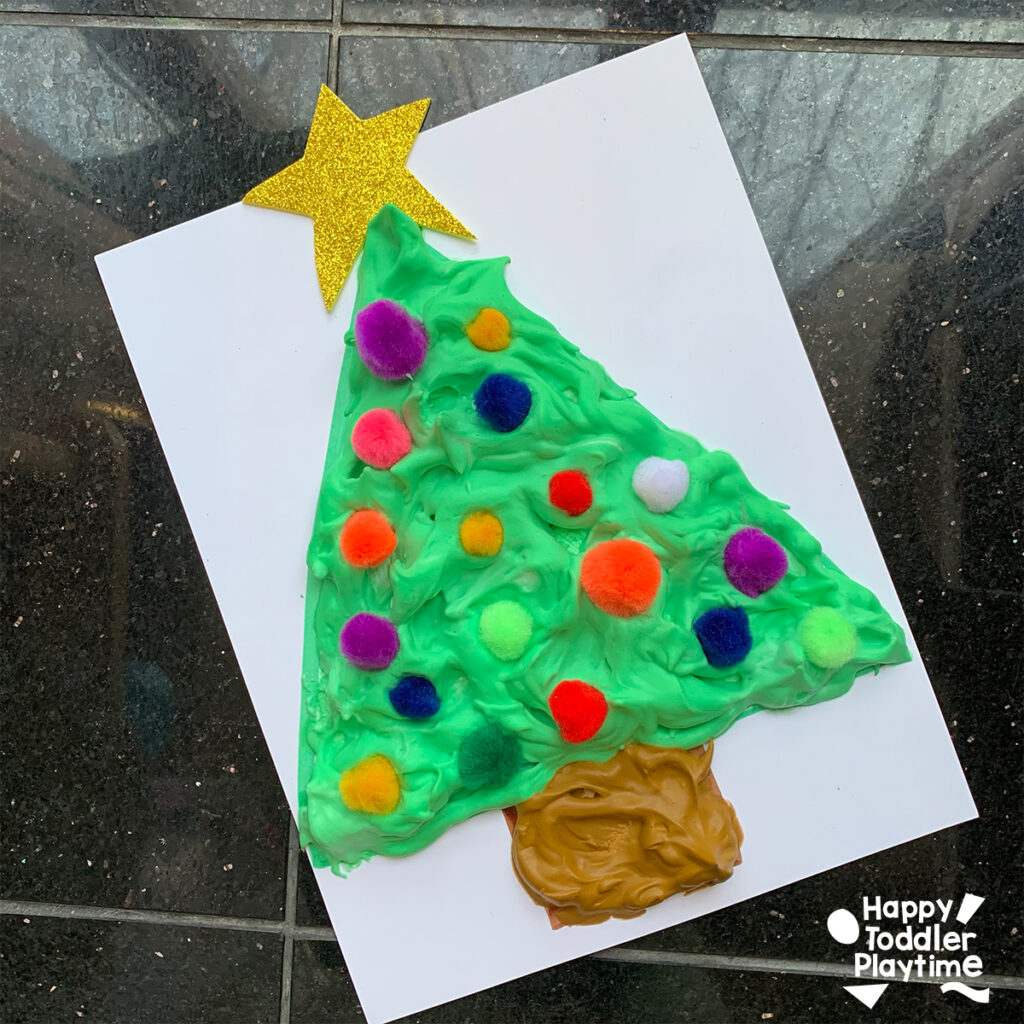
Materials
- Shaving cream
- School glue
- Green food colouring
- Bowl
- Paint brush
- White card stock
- Marker
- Pom Poms
- Glitter gold foam sheet
- Scissors
How to Set Up
- On a sheet of white card stock or white paper, draw the basic shape of a Christmas similar to what I have drawn below.
- In a bowl combine combine 1/4 white school glue, 1/4 shaving cream and a few drops of green food colouring. Use a craft stick or paint brush to mix it. Puffy paint resembles cloud but it doesn’t last for ever. Use the paint within 30 minutes. Once dry the paint will remain full for a few hours and then loose it thickness over time. It should feel dry to the touch.
- Invite your little one to take their paint brush and cover the entire tree triangle with the green puffy paint.
- Once it is covered, invite them to decorate their Christmas Tree using Pom Poms. Have them place the Pom Poms into the puffy paint while its wet to decorate the tree.
- Mix a second batch of puffy paint, this time brown. I let my kids help me out with this one. They thought this batch looked a lot like… well you can probably guess. It made for plenty of laughs.
- Use the brown puffy paint to paint the trunk of the tree.
- Cut out a star from gold foam paper and glue it on top of the tree! Set it aside to dry!
16. Hot Chocolate Sensory Bin
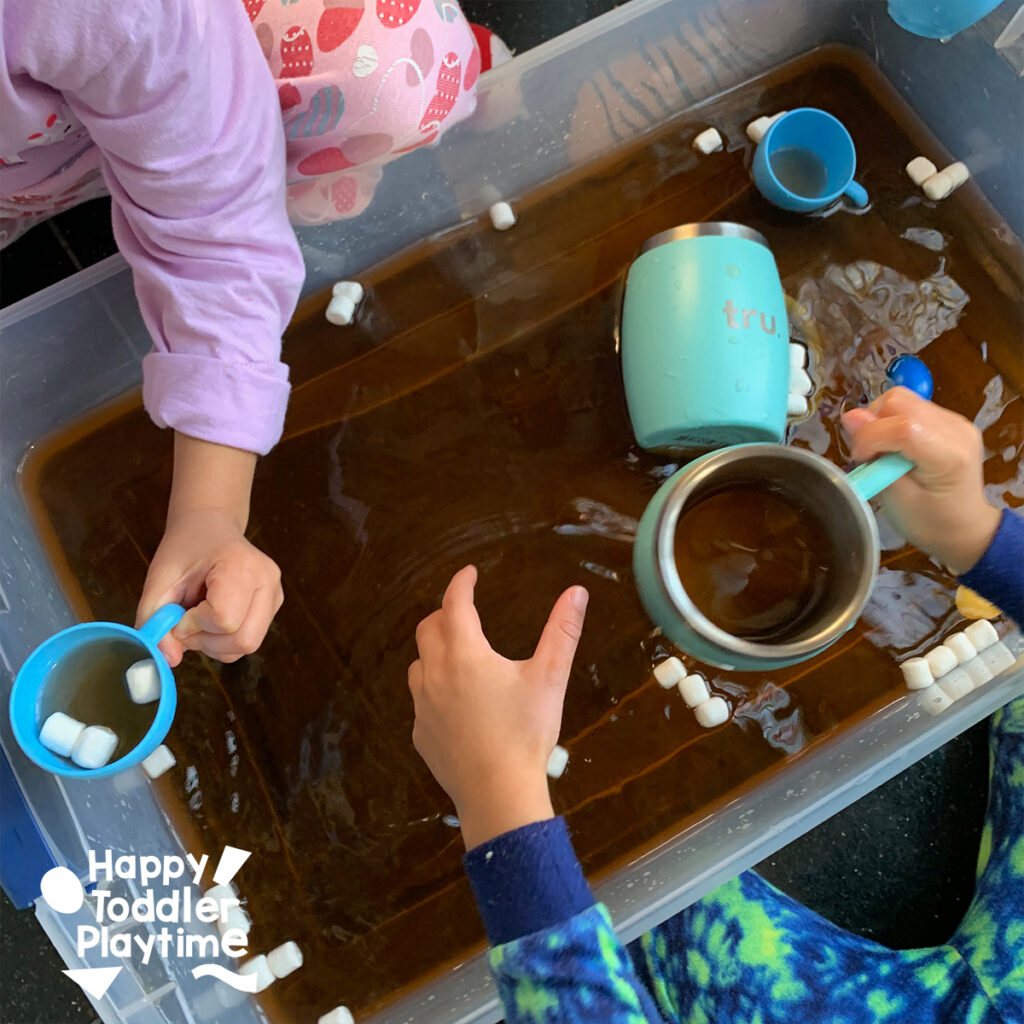
Materials
- Water
- Brown food colouring
- Sensory Bin
- Play or real mug or tea cups
- Mini marshmallows or white pom poms
- Play or real tea spoons
How to Set Up
- Grab your sensory bin and fill it cold water. Add a single drop of brown food coloring and mix. Test to make sure that it won’t stain your child’s hands by dipping your finger in first. If your fingers gets stained add more water or remove some of the coloured water you have and add more water without adding any more brown food colouring. The small amount of food colouring and lots of water mix did not stain my children’s clothing.
- Add some pretend play tea cups and mugs or some travel mugs for scooping and pouring. Also add a few pretend play spoons or real tea spoons for scooping.
- Next, add mini marshmallows. Don’t add the marshmallows until right before your child is ready to play. They will eventually dissolve in the water even if the water is cold.
- Invite your child over to their own hot chocolate stand! Let your little ones play and pretend to make steaming cups of pretend hot chocolate for you, their siblings or stuffy animals.
17. Christmas Ornament Ramp

Materials
- Cardboard
- Shatterproof Christmas baubles or balls
How to Set Up
- Make a ramp with a cardboard box.
How to Play
Invite your child to drop shatterproof baubles down the ramp. There are so many variations of this fantastic ramp activity that you can do. Plus don’t waste your wonderful ramp on just baubles! Once they get bored of the baubles instruct them to grab their favorite mini cars and race them down the ramp!
18. Santa Sensory Bin
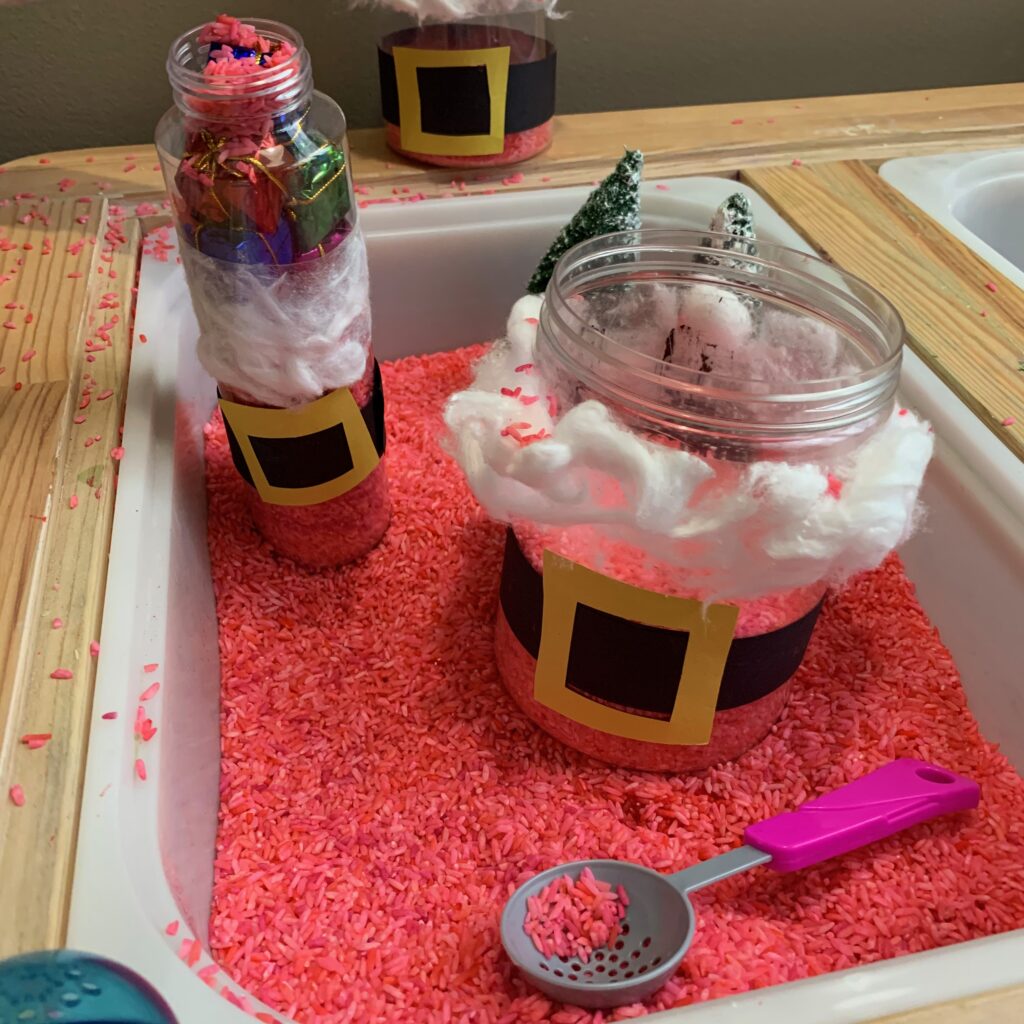
Materials
- Sensory Bin or Sensory Table
- Red Coloured Rice
- Mini presents
- Colourful bowls
- Scoopers or spoons
- Miniature Pine Trees
How to Make Red Colored Rice
What You’ll Need
- 1 Cup of White Rice
- 1/2 tsp White Vinegar
- Several Drops of Red Gel Food Coloring
- Large Ziploc Bags
- Parchment Paper
- Baking Sheets or Tupperware containers
How to Make
- Combine the rice, white vinegar and red food coloring in a Ziploc bag.
- Seal it carefully and mix the contents throughly.
- Repeat for each color.
- Lay a sheet of parchment paper on a baking sheet or line a Tupperware container.
- Spread the colored rice out on the parchment paper and allow it to dry overnight.
Troubleshooting
If you don’t have gel food coloring, regular food coloring will work fine. If you want your rice to be more vibrant add more than just a few drops of food coloring and a small amount of white vinegar. Although the instructions calls for 1 cup of rice I usually make between 6-7 cups of rice for a sensory bin.
How to Set Up
- Make the Santa belly bottles. Cut out a black belt long enough to fit around your containers.
- Cut out a yellow square. Cut the middle out the yellow square and glue it to the black belt
- Glue the belt to around your bottle or containers. Glue cotton balls on top the belt.
- Pour the rice in the sensory bin. Add the presents, trees, scoopers and Santa Belly bottles or containers.
How to Play
Invite your little one to scoop and pour the rice into the bottles to fill them and make the Santa Bellies red.
19. Santa Sticky Wall
Materials
- Con-Tact Paper
- Red Construction Paper or Foam Sheet
- Masking Tape
- Colourful IKEA Bowls
- Cotton Balls
How to Set Up
Grab your red foam sheets and scissors. Cut a large triangle hat for Santa. Glue a cotton ball to the top. Also cut a large red circle for Santa’s nose.
Cut a large square from your roll of contact paper. On the back draw a large round circle for Santa’s face. Tape your contact paper up on the wall with the sticky side facing out.
Grab your cotton balls, large googley eyes, Santa hat and nose.
How to Play
Next, I invited my twin toddlers to build a Santa Claus! First, they put up his hat, nose and eyes, then they started to create his beard using cotton balls.
To create the beard, your toddler can either dab the cotton balls on the contact paper or they can stick the entire cotton ball on the wall.
20. Giant Gingerbread Craft
Supplies
- Kraft Paper roll
- Black Sharpie
- Kwik Stix Solid Tempera Paint
- Masking Tape
- Stickers
How to Set Up
- Have your little one lie down on the floor beside the kraft paper roll. Unroll the paper on the floor the same length as your child.
- Cut the paper slightly longer than the length of your child. Tape it down to the floor with the masking tape.
- Using a pencil trace around your child’s body on the kraft paper to create an outline of your child and your gingerbread manoutline.Retrace the outline using the black sharpie. I did not trace my daughter’s outline with the black sharpie the first time as I I did not want to get the permanent marker on her clothing.
How to Play
I had my little one draw a face on her gingerbread girl outline using Kwik Stix Solid Tempera Paint. These are great for activities like this as they are paint but they dry in seconds. Making them ideal painting tools for toddlers! Don’t have paint sticks? No worries you can use whatever markers or crayons that you have!
Then decorate the rest of your gingerbread girl or boy. Use foam stickers and Kwik Stix Solid Tempera Paint to decorate the arms and legs and to make buttons.
21. Feed Santa Cookie Game
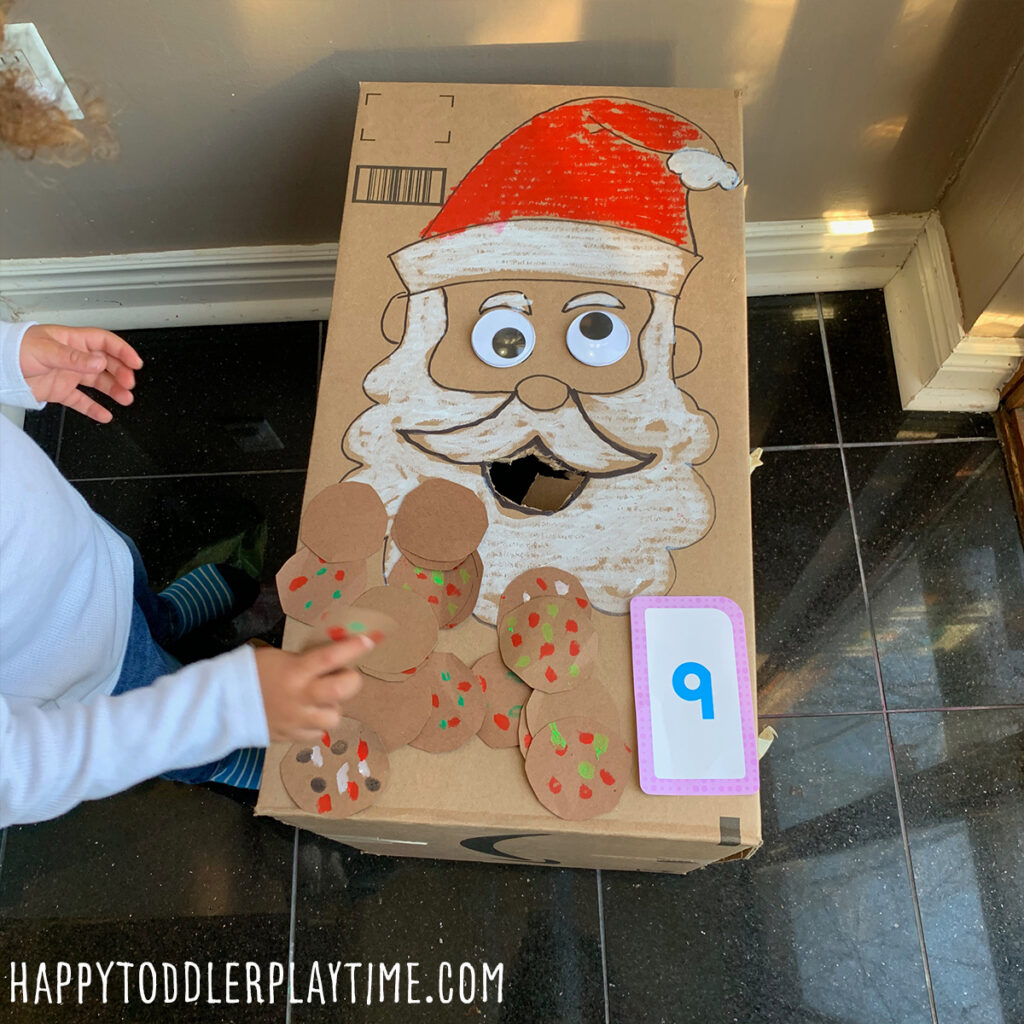
Materials
- Cardboard Box
- Black Sharpie
- Paint Sticks
- Brown Construction Paper
- Scissors
- Large Googley Eyes
- Number flashcards
- Large dice
How to Set Up
- First thing you need a cardboard box. I was doing this activity with all three of my kids so I used a very large box but this can be done with any size box. Draw the outline of a Santa face with your black sharpie. Use my picture as a reference.
- Grab your paint sticks and colour in your Santa’s beard, hair and hat. Take a pair of scissors and cut out the mouth of the Santa big enough to fit cookies you make. Add large googley eyes for added character to your Santa!
- I used brown construction paper to make my M&M Christmas cookies. You can also use spare cardboard. Cut them into small circles and use you paint sticks to create colourful M&M cookies.
- Then I grabbed my number flashcards. They don’t get used try often since I prefer to use hand-ons on activities to teach and practice counting withy kids but they are useful for activities like this. If you don’t have number flashcards you can create your own or use a large dice.
How to Play
Flip over a flashcard or role the dice and then ask your toddler or preschooler what number it is. If you are using flashcards and it has objects on it depicting the number represented have them count those objects. If you are using a dice, count the number of dots.
Tell them that Santa is very hungry (I actually became the voice of Santa and asked my toddlers to feed me [Santa] that number of cookies on the flashcard). They absolutely loved that I pretended to be Santa and eagerly counted out the right number of cookies to feed Santa.
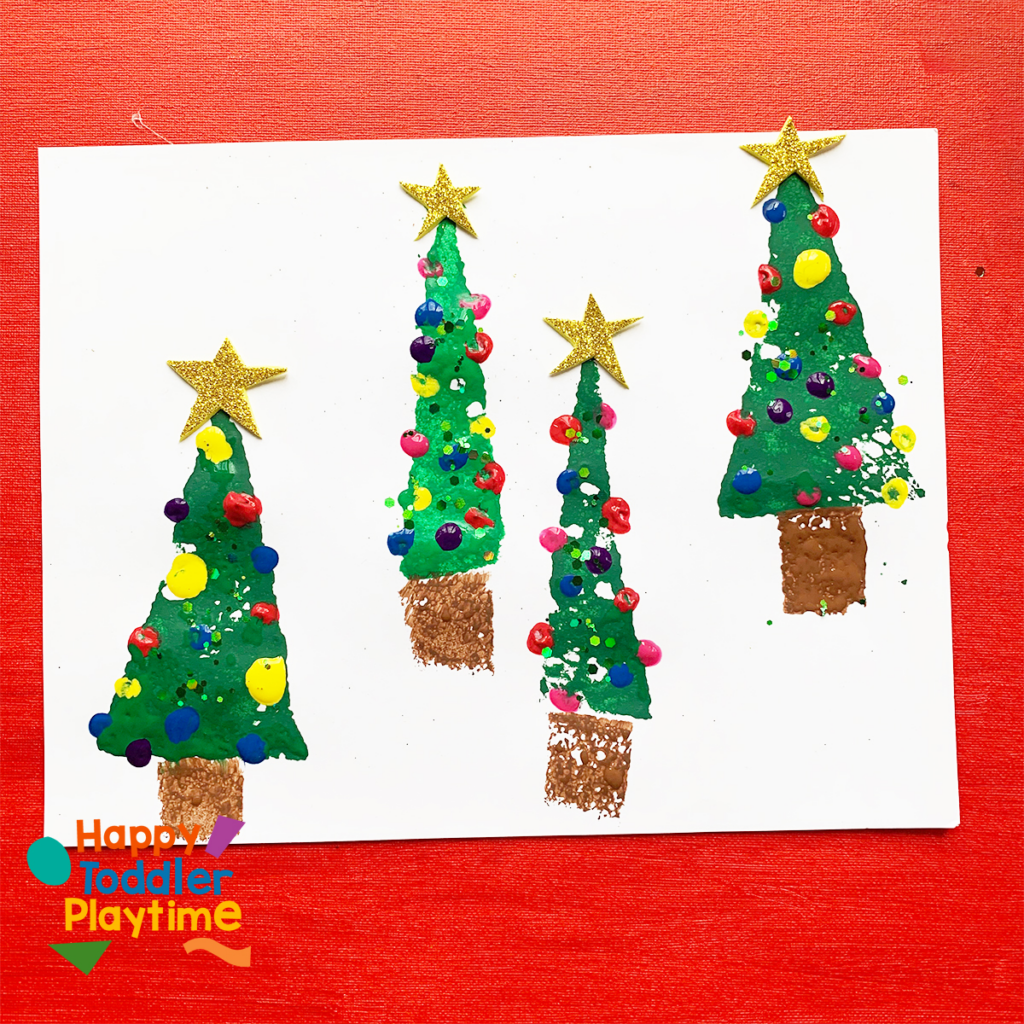
22. Fork Painted Christmas Tree

Materials You’ll Need
- White cardstock
- Plastic fork
- Washable paint (green, red, yellow, etc.)
- Glitter (gold and green)
- Paper plate (for the paint)
- Q-tip
- Bottle of glue
Step-by-Step Instructions
- Use a pencil to trace the outline of a triangle shape on the white cardstock as a guide for where to paint. Dip the back of the plastic fork into the green paint. Press the fork onto the white cardstock to create the texture of the tree with the teeth of the fork pointing down.
- While the paint is still wet, sprinkle green glitter over the tree for a sparkling effect.
- Dip a Q-tip into different colors of paint and dot it onto the tree to make ornaments.
- Add a yellow star from sparkly gold paper.
23. Cotton Ball Santa

Materials
- Cardbaord
- Cotton balls
- Black markers
- Paint
- Contact paper
How To Make A Cotton Ball Santa
- Draw the outline of a Santa and colour in the hat and nose.
- Use a craft knife to cut out the beard of Santa
- You can also cut out the edge of Santa’s hat and end as well.
- Cut a piece of contact paper the same size of the cardboard. Peel off the paper backing and stick it on the back of the cardboard Santa.
How to Play
Invite your child to use cotton balls to fill in the beard with the cotton balls.
24. Sponge Painted Christmas Tree Craft
Materials
- Card stock
- Sicssors
- Sponges
- Washable paint (red, black, white or green)
- Paperplate
- Q-tips
- Sparkly foam sheet or star Glue
How to Make a Sponge Painted Christmas Tree
- Grab a sting sponge and use a ruler and marker to draw a triangle on the sponge.
- Cut it out with a pair of scissors.
- You will have three triangles that you can use to paint different shaped Christmas trees!
Time to Paint
- Grab a sheet of white card stock.
- On a paper plate pour out some green paint.
- Dip the first sponge into the paint and them onto the card stock.
- Continue using the same sponge or the different shaped triangles
Turn to Trees into Christmas Trees
- Pour out some paint in different colours scubas red, yellow, blue, purple.
- Take a q-tip and dip it into the paint and them paint Christmas lights all over the trees.
- Take a sheet of sparkly gold foam paper, draw stars on the back and cut them out.
- Glue the stars to the tops of the Christmas trees.
- Cut a small square from a second sponge. Pour out some brain paint and dip the sponge into the brown paint. Print it under each tree for the trunk.
25. Super Easy Salt Dough Recipe

Simple Ingredients for Salt Dough Recipe
- 2 cups all-purpose flour
- 1 cup salt
- 1 cup warm water
Easy Instruction for Salt Dough Recipe
- Preheat your oven to 200°F.
- In a large bowl, mix together the flour and salt until well combined.
- Slowly add in the warm water, stirring continuously until the mixture forms a smooth dough. If the dough is too dry, add a little more water, and if it’s too wet, add a little more flour.
- Knead the dough for a few minutes until it becomes smooth and elastic.
- Roll out the dough to the desired thickness, using a rolling pin or your hands. For ornaments, you’ll want the dough to be about 1/4 inch thick.
- Use cookie cutters or other shapes to cut out your desired shapes from the dough. You can also use a knife to cut out free-form shapes.
- If you want to make ornaments or other hanging decorations, use a straw to poke a small hole in the top of each shape.
- Place the shapes on a baking sheet lined with parchment paper and bake in the preheated oven for 2-3 hours, or until the dough is completely dry and hard.
- Once the shapes are cool, you can paint them with acrylic paint or decorate them with markers or glitter glue.
How To Play
Once your salt dough shapes are fully dry and hard, you can paint them with acrylic paint, which is easy to find at any craft store. Make sure your paint is completely dry before adding a second coat or any additional decorations.
Loved this idea? Share it with a friend who needs a little creative inspiration today!